
Art Side Hustle: A Surprisingly Simple S.T.A.R. System That Actually Works 🚀
Art side hustle doesn’t have to mean burning out, posting daily, or guessing what might sell. In this guide, you’ll follow a simple 30-day S.T.A.R. routine to finish a small set of work, launch it in the real world, and turn the feedback into your first sales (or solid leads). If you’re a beginner, this is built for you: clear steps, tiny daily actions, and realistic monetization paths you can actually stick with.
Before we jump in, here are the anchor tools and terms we’ll build the whole plan around (so you always know what to do next):
- S.T.A.R. Cycle (Strategize → Think & Create → Adapt → Reach Out)
- Goldilocks Zone (not stuck in planning, not rushing past learning)
- Growth Ratchet (launch + learn, over and over)
- Big Squirrel Brain Dump (get all ideas out, then pick ONE)
- Chaos Goblin (fear energy—use it, don’t obey it)
- Sell sheet + pitch tracker (simple outreach system)
- Wholesale/Retail Pricing Formula (a beginner-friendly price floor)
- 3 Frameworks (Passive income, Products, Teaching)
If you’ve ever said, “I just need more time,” this guide is for you. You’re going to build a specific skill: the ability to finish, launch, and learn from your art consistently—in a way that turns into sales and opportunities (even with a day job).
The Growth Ratchet: How Artists Actually Learn What Sells
If you’ve ever shared a piece you loved and got nothing back, the problem usually isn’t your talent. It’s that you didn’t get a clear signal—so you don’t know what to improve.
The Growth Ratchet is a simple loop that fixes that: ship → notice → adjust → ship again. Each cycle locks in one lesson, so your side hustle moves forward in “clicks” instead of random leaps.
The Growth Ratchet in 4 steps
- Make one clear thing (a design, a mini collection, one product listing, one pitch).
- Put it in front of real people (Etsy listing, Instagram post, email, pitch).
- Collect signals (what they save, click, ask, buy).
- Change one thing before the next launch (title, niche, mockup, format, price, audience).
That’s it. The “ratchet” part is step 4: you never repeat the exact same launch twice.
The only three signals you need as a beginner
You don’t need complicated analytics. You need decision-making signals:
- Attention: people stop scrolling (best signs: saves, shares, favorites).
- Intention: people show interest (DMs, “how much?”, add-to-cart, “do you ship?”).
- Action: people pay or commit (sales, signups, client “yes,” brand replies).
Early on, attention + intention is already progress. It means your work is close to sellable—you just need to tighten clarity and the buying path.
Here’s a real-world example of how the ratchet “clicks” forward:
- Week 1: your print gets favorites but no sales → you add a clearer lifestyle mockup + a “size & shipping” bullet list
- Week 2: favorites stay high and you get your first sale → now you know the problem wasn’t the art, it was clarity
A 15-minute weekly review (no spiraling)
Once a week, set a timer for 15 minutes:
- Write what you shipped (1 minute)
- Pull 3 numbers (5 minutes)
- Etsy: views, favorites, orders
- Social: saves, shares, link clicks
- Pitches: sent, replies, follow-ups
- Write one lesson (5 minutes)
- “Cozy themes got 3x the saves.”
- Pick one improvement (4 minutes)
- Better mockup, clearer title, tighter niche, simpler offer, follow-up message
Put that one improvement at the top of your to-do list for the next cycle.
Quick diagnosis when something “flops”
Same outcome (no sales), different causes:
- Low views: distribution problem (keywords, posting frequency, wrong audience).
- Views but no favorites/saves: relevance problem (too broad, unclear theme).
- Favorites but no sales: conversion problem (price/value mismatch, confusing listing, weak mockup).
Your job isn’t to panic. Your job is to identify which problem you have and fix one thing.
Micro-experiments that teach you fast
One test per cycle is enough:
- Format: print vs sticker vs digital download
- Niche: “cat lovers” → “black cat lovers” → “witchy black cat lovers”
- Mockup: plain preview vs lifestyle frame-on-wall
- Title: lead with niche vs lead with product type
- Price: small adjustment within competitor range
Keep the art you love. Experiment with the packaging.
“But I have zero audience”—what counts as shipping?
If you’re starting from scratch, shipping can be tiny:
- Publish a listing and share it with 5 friends who genuinely like that niche
- Post to one community (a hobby group, a local forum, a Discord)
- Send 3 pitches to brands that already sell products in your style lane
You’re not trying to “go big.” You’re trying to get your first signals.
The simplest tracker that keeps you consistent
Create one table (Google Sheet or a Notion page, like Notion):
- Date shipped
- What/where you shipped
- Signal (favorites/saves/replies/sales)
- One lesson
- One improvement for next time
That’s your Growth Ratchet. Now let’s match your next steps to your current level, so you don’t try to run before you can walk.
The 4-Level Side Hustle Ladder (Find Your Starting Point)
Most people stall because they follow advice meant for a different level. This ladder helps you choose the right next move—and avoid the most common trap at your stage.
Level 1: The Curious Starter
Signs you’re here:
- You create in bursts, not on a schedule
- You have unfinished pieces and scattered ideas
- You avoid posting or feel exposed when you do
- You don’t know what to sell first
Your next move (7–14 days): finish a tiny “sellable set.”
- Pick one theme you naturally repeat
- Finish 3 pieces that look like they belong together
- Make one simple mockup for each
Common trap: waiting for confidence.
Confidence usually shows up after you ship, not before.
Good progress at Level 1 looks like:
- People start saving your work
- Someone asks, “Do you sell this?”
- You can confidently show a small portfolio
Level 2: The Consistent Maker
Signs you’re here:
- You make art weekly (or close)
- You have 5–15 pieces you like
- You’re ready to ship something, but you overthink it
Your next move (2–4 weeks): run a mini collection + one offer.
- Choose 3 related designs
- Choose one format (print, sticker sheet, download, pitch pack)
- Ship one listing (or send 3 pitches)
- Do a 7-day signal check and one improvement
Common trap: making new art nonstop without turning it into an offer.
At this level, you don’t need more ideas—you need one clear product path.
Good progress at Level 2 looks like:
- Favorites, saves, link clicks, first sale, or first reply
Level 3: The First-Time Seller
Signs you’re here:
- You’ve sold something (or tried)
- Results are inconsistent
- You’re unsure what to make next
- You want structure
Your next move (4–8 weeks): build a simple weekly pipeline.
A beginner-friendly weekly rhythm:
- 1 creation session (new work)
- 1 product session (mockups/listing updates)
- 1 visibility session (post/email/pitch)
Add a small “offer ladder”:
- one low-price item (download/sticker)
- one mid-price item (print)
- one higher-value option (bundle/commission/workshop)
Common trap: relying on motivation.
Your pipeline should work even on low-energy weeks.
Level 4: The Growing Builder
Signs you’re here:
- You can earn, but not predictably
- You want systems (launches, outreach, inventory)
- You’re considering licensing/wholesale/teaching
Your next move (8–12 weeks): pick ONE growth lever.
Choose one:
- More traffic (consistent content/SEO/collabs)
- Better conversion (photos, titles, pricing, clarity)
- Bigger order size (bundles/sets)
- New channel (licensing, wholesale, workshops)
Common trap: trying to scale everything at once.
Pick one lever, measure it for a month, then decide what’s next.
Once you know your level, you can choose actions that fit your reality. Next, we’ll fix the other common problem: doing too much thinking or too little thinking.
Your Goldilocks Zone: Balancing Overthinking vs Underthinking
Every artist swings between two extremes:
- Overthinking: “Not ready yet.”
- Underthinking: “I shipped it—next!”
The Goldilocks Zone is the middle: decide → ship → review → adjust. It keeps your work moving and improving.
Overthinking: “I’ll launch when it’s perfect”
This often shows up as “productive” tasks:
- rebranding, researching, redesigning, rewriting
- polishing one piece for weeks
- waiting to have a “full shop” before listing anything
Money problem: no launch = no signal = no growth.
Fix: a test-ready checklist
Before you keep polishing, ask:
- Is the idea clear at a glance?
- Is the quality acceptable?
- Can I explain who it’s for in one sentence?
- Can I improve it later if it gets traction?
If yes, you’re ready to test.
Underthinking: “I posted once, so I marketed”
Underthinking is speed without learning:
- random posting with no pattern
- switching niches weekly
- ignoring which pieces get saved/favorited
Money problem: you repeat the same mistakes and never build momentum.
Fix: one review note per launch
After each launch, write one sentence:
- “This theme got more saves.”
- “This listing got views but no favorites.”
That note tells you what to adjust next.
The weekly Goldilocks routine (3 actions only)
If you do these three things weekly, you will improve:
- Ship one thing (listing/post/pitch/workshop invite)
- Track one signal (favorites/saves/replies/sales)
- Change one thing (title/mockup/niche/format/price)
Simple wins because it’s repeatable.
“Definition of Done” for a sellable piece
Use this to finish faster without lowering standards:
- Artwork file is complete
- Product format chosen (size/file type/layout)
- At least one clean mockup/photo
- Title includes product + niche (who it’s for)
- Description answers: what you get, size, delivery/shipping
Hit that, then ship.
A 5-minute friction audit (the fastest conversion boost)
If people favorite but don’t buy, run this quick check:
- Can they understand the product in 3 seconds from image #1?
- Is the size/delivery info easy to find?
- Does the description clearly say what they get?
- Is there a trust signal (clear policies, clean photos, consistent style)?
Choose one fix. Don’t rewrite everything.
The 48-hour rule (tiny deadline, big results)
If you’re stuck, give yourself 48 hours to launch a version 1. Then schedule improvements later.
Why it works:
- it breaks the “someday” loop
- it forces real feedback
- it keeps you in the Growth Ratchet
Now that your thinking is balanced, we need to solve the next blocker: too many ideas pulling you in every direction.
Squirrel Syndrome to Focus: Do the Big Squirrel Brain Dump
Creative brains generate options nonstop. That’s a gift—until it stops you from finishing. The goal isn’t to kill your ideas. The goal is to choose one idea long enough to get results.
Step 1: Dump everything (10–20 minutes)
Set a timer and write every idea, no editing:
- prints, stickers, patterns, portraits, zines
- kids’ book art, classroom posters, wedding invites
- tutorials, workshops, licensing collections
You’re clearing mental clutter so you can focus.
Step 2: Tag each idea by money path
Next to each idea, add one letter:
- P = Products (prints, stickers, downloads)
- L = Licensing (sell sheets, collections for brands)
- T = Teaching (workshops, tutorials, courses)
- S = Services (commissions, brand illustration)
This turns “chaos” into four clear business options.
Step 3: Choose your 30-day focus with the ONE-Project Filter
Score each idea 1–5:
- Time reality (can I do it with ~5 hours/week?)
- Skill reality (can I make a decent version now?)
- Market clarity (do I know who buys it and where they are?)
- Shipping speed (can I launch a version 1 in 30 days?)
Pick the highest score—or the most doable option that still excites you.
Tie-breaker rule: choose the idea with the shortest path to shipping.
Shipping creates signals. Signals create confidence.
Step 4: Create a “Later Parking Lot” so ideas don’t hijack you
Make a section called: Later Ideas (Not This Month).
Any new shiny idea goes there. You’re not ignoring it—you’re postponing it so your current project can grow.
Step 5: Write a one-sentence project brief
This makes your next actions obvious:
- “For the next 30 days, I’m creating a mini collection of ___ for ___.”
Examples:
- “cozy reading nook prints for book lovers”
- “cute science classroom posters for teachers”
- “witchy cat stickers for Halloween shoppers”
Step 6: Pick your first shippable version (version 1)
Choose one:
- 1 Etsy listing + 2 supporting posts
- 3 pitches + 1 sell sheet
- 1 live workshop + 1 signup form
Version 1 should feel slightly scary but totally doable.
Step 7: Protect your focus with a weekly ritual (10 minutes)
Once a week, do this:
- Write your one project brief at the top of the page
- List the 3 actions that move it forward this week
- Move every other task into the Parking Lot
This is how you stay creative without getting scattered.
Step 8: End with a 10-minute next action
Before you stop, choose one tiny task:
- create a folder for the project
- sketch 3 thumbnails
- write 10 possible product titles
- find 10 competitor listings for pricing reference
That tiny action prevents your focus from fading overnight.
When you complete this brain dump, you’ll feel the difference immediately: fewer mental tabs open, less guilt, more forward motion. And with focus + the Growth Ratchet, you’re ready for the next sections where we turn this into a repeatable practice plan and real monetization routes.
The Skill Stack: S.T.A.R. Cycle + Launch-and-Learn (What You Practice)
If you only remember one thing from this whole guide, make it this:
Your art side hustle grows when you practice shipping—not when you practice “waiting until you’re ready.”
That doesn’t mean rushing messy work out the door. It means building a repeatable skill stack that turns your creativity into something real people can find, understand, and buy.
The simplest stack I’ve seen work for beginners is the S.T.A.R. Cycle (Strategize → Think & Create → Adapt → Reach Out) paired with one habit: Launch-and-Learn.
Strategize: Choose a “who” and a win you can actually hit
Strategize is not writing a 20-page business plan. It’s choosing a direction so your brain stops spinning.
Your beginner strategy needs three answers:
- Who is this for?
Pick one group, not “everyone.”
Examples: cozy home decor lovers, plant people, cat parents, bookworms, teachers, hikers, cottagecore fans. - What are you selling first?
One format only for 30 days: print, sticker sheet, digital download, licensing pitch pack, or workshop. - What does a “win” look like this month?
A win is a signal, not a fantasy.
- 1 listing published
- 3 pitches sent
- 10 email subscribers
- 1 paid workshop with 5 attendees
- 1 sale or 1 serious inquiry
Why this helps you earn: clarity speeds up everything—titles, mockups, pricing, marketing, and product decisions.
Mini exercise (10 minutes):
Write this sentence and don’t overthink it:
- “My art is for ______ who love ______.”
Think & Create: Build a tiny collection that looks intentional
Beginners often make random one-offs, then wonder why it’s hard to sell. A mini collection fixes that.
A tiny collection = 1 hero + 2 helpers
- Hero: the main illustration (the “wow” piece)
- Helper #1: a variation (same subject, different pose/colors)
- Helper #2: a pattern or simple supporting design
This works for products and licensing and content.
Why this helps you earn: collections make buying easier. People trust consistency. Bundles become possible. Your shop/portfolio looks “real” faster.
Mini exercise (30 minutes):
Pick one existing piece you like. Sketch two supporting pieces that match the vibe. Don’t redesign your entire identity—just create a set.
Adapt: Turn art into an offer people can say yes to
Adapt is the “translation step.” Your art becomes a product when you package it clearly.
Adapt includes things like:
- A clean preview image
- A lifestyle mockup (frame on wall, sticker sheet in hand)
- A simple description that answers obvious questions
- A delivery method (digital file, print shipped, sign-up link, etc.)
Helpful beginner tools:
- Canva for mockups, sell sheets, product images
- Notion for planning and tracking
- Instagram for visibility and testing what resonates
- Etsy for simple product listings
- Google Forms for workshop signups or interest lists
Why this helps you earn: people can’t buy what they can’t understand in 5 seconds.
Mini exercise (20 minutes):
Write a 3-line “offer description” you can reuse:
- What it is
- Who it’s for
- What they get (size/files/shipping timeline)
Reach Out: Visibility is a skill, not a personality trait
A lot of artists assume they need confidence before they post or pitch. Usually it’s the opposite.
Reach Out can look like:
- 2 posts + 3 stories on Instagram this week
- One Etsy listing shared in 2 places
- 3 pitches to brands (for licensing/services)
- 20 invites to a workshop
You don’t need to “go viral.” You need to be findable.
Why this helps you earn: no reach-out = no data = no sales signal = no growth.
Mini exercise (10 minutes):
Write a launch message template:
- “I made this for ______.”
- “If you love ______, you might like this.”
- “It’s available here: ______.”
Launch-and-Learn: The habit that makes S.T.A.R. work
Here’s the simple rule that keeps everything moving:
Every time you launch, you must learn one thing and change one thing.
That’s the whole “launch-and-learn” habit.
Your learning doesn’t have to be complicated. Here are beginner-friendly “learning prompts”:
- Which piece got the most saves/favorites?
- Which phrase made people click?
- Which mockup did better?
- What question did people ask repeatedly?
- If nobody reacted… did anyone actually see it?
Your “one change” could be:
- Better first image
- Clearer title (lead with niche + product)
- Adjust price slightly
- Improve description (bullets!)
- Post at a different time
- Share to one more relevant place
This is how artists stop guessing and start improving.
The 30-Day Art Side Hustle S.T.A.R. Challenge
This is a realistic plan for normal humans with jobs, school, kids, or low energy weeks.
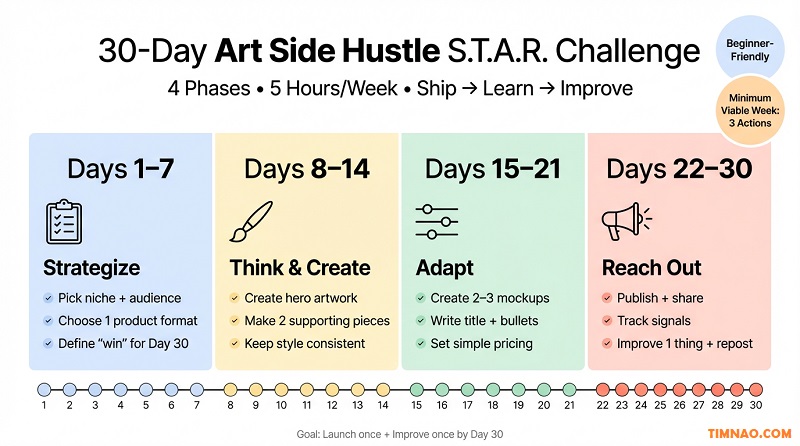
Assume about 5 hours/week. If you can do more, great—but don’t build a plan that collapses the first time life gets loud.
Pick ONE track (don’t mix)
Choose one track for your first 30 days:
- Track A: First Etsy Listing (digital download or print) on Etsy
- Track B: First Licensing Pitch Pack (sell sheet + mini collection)
- Track C: First Paid Workshop (live session + signup page)
If you try to do all three, you’ll end up doing none well. Pick the one you can ship fastest.
Days 1–7: Strategize without sinking into “research”
Your job this week is to decide and set up.
Do these tasks (one per day):
- Choose your audience: who is this for?
- Choose your format: what are you selling?
- Choose your mini collection theme (hero + two helpers)
- Create a “definition of done” checklist (keep it short)
- Gather references or inspiration (limit to 30 minutes)
- Set up your workspace + folders (reduce friction)
- Create your first rough draft (something visible!)
Outputs by Day 7:
- One clear sentence: “I’m launching ______ for ______ by Day 30.”
- One rough hero piece started or finished.
How this ties to earning: you’re replacing vague hope with a concrete deliverable.
Days 8–14: Think & Create the mini collection
This is your building week. Keep the goal small: finish the set, not a masterpiece museum.
Tasks:
- Finish hero piece (or finalize linework + color)
- Create helper piece #1 (variation)
- Create helper piece #2 (pattern/support)
- Export clean files (consistent sizes/naming)
Beginner-friendly rule:
If you get stuck, simplify:
- fewer colors
- fewer details
- one background style for all three
Outputs by Day 14:
- A 3-piece mini collection ready to adapt into an offer.
How this ties to earning: collections become listings, bundles, pitch packs, workshop projects, and content themes.
Days 15–21: Adapt into something sellable
This week is where most beginners freeze. You might think, “My art is done… now what?”
Now you package it.
For Track A (Etsy Listing):
- Create 2–3 mockups in Canva
- Write title + description (use bullets for clarity)
- Decide the file format or printing plan
- Draft your listing (even if you don’t publish yet)
For Track B (Licensing Pitch Pack):
- Make a simple sell sheet in Canva
- Prepare files (high-res, named cleanly)
- Build a small list of target brands (10–20)
- Create a pitch email template
For Track C (Workshop):
- Outline your workshop (start → demo → practice → share)
- Create a signup form using Google Forms
- Decide price + date/time
- Create a simple “what you’ll learn” description
Outputs by Day 21:
- Your offer is packaged and ready to launch.
How this ties to earning: packaging is what makes your art buyable, not just admirable.
Days 22–30: Reach Out, launch, and do one improvement loop
This is where your Growth Ratchet clicks forward.
Launch tasks (choose based on track):
- Publish your Etsy listing
- Send your first 3–5 pitches
- Promote your workshop signup
Then commit to the “one improvement loop”:
- Check signals after 48 hours and after 7 days
- Change one thing
- Re-share or follow up
Beginner-friendly outreach plan (repeatable):
- Day 22: launch (listing/pitches/signup)
- Day 23: post the story behind the piece
- Day 24: show a close-up/detail
- Day 25: share mockups or use-cases
- Day 26: follow-up pitch or reminder post
- Day 27: answer common questions in a post
- Day 28: make one improvement (title/mockup/offer clarity)
- Day 29: re-share with the improvement
- Day 30: do a 15-minute review + choose your next cycle
Outputs by Day 30:
- One complete launch
- One improvement loop
- Notes that make your next month easier
How this ties to earning: you’re building the habit that produces results over time, not just one burst of effort.
Systems That Stick: Five Hours a Week, Not Perfect Weeks
Your side hustle won’t grow because you had one inspired weekend. It grows because your system makes progress boring and repeatable.
Here are systems that work even when your week is messy.
The 5-hour weekly schedule (copy/paste this)
You can adjust the days. Keep the structure.
- Session 1 (45 min): Create
Work on the next piece in your collection or your next product. - Session 2 (45 min): Adapt
Mockups, listing updates, sell sheet edits, workshop slide prep. - Session 3 (45 min): Reach Out
Post, email, pitch, follow-ups. - Session 4 (2–2.5 hrs): Deep Work Block
Finish the hero piece OR publish the listing OR build the pitch list. - Admin Sprinkle (15 min): Track + tidy
Update your tracker, rename files, prep next session.
This prevents the common beginner issue: “I only make art, then I never sell it.”
The Minimum Viable Week (for bad weeks)
When life happens, don’t quit. Downshift.
Minimum viable week = 3 actions total:
- 30–45 minutes create
- one launch action (post/list/pitch)
- one 5-minute review note
Even a tiny week keeps your identity intact: you’re still a person building a side hustle.
Environment design: make “starting” stupid easy
Motivation is unreliable. Friction is real.
Try one or two of these:
- Leave your sketchbook/tablet out
- Keep your tools plugged in and ready
- Create a “mockup template” in Canva once, reuse forever
- Keep a single folder system for exports (so you don’t lose files)
If it takes you 10 minutes to “set up,” you’ll avoid starting.
One dashboard (so your brain stops reopening tabs)
Use Notion or a simple doc. Your dashboard should include:
- Current 30-day project sentence
- This week’s 3 priorities
- Launch checklist
- Metrics tracker (super simple)
- Parking lot for ideas
When your plan lives in one place, you stop negotiating with yourself daily.
The “Start small” content system (no daily posting required)
If you’re using Instagram, don’t aim for perfection. Aim for consistency.
A beginner-friendly weekly content set:
- Post 1: the finished piece (clear niche caption)
- Post 2: behind-the-scenes (process, tools, sketch)
- Stories: 2–3 quick updates (poll, close-up, question)
If that feels like a lot, start with one post per week—just don’t disappear for months.
A beginner tracker that doesn’t become homework
Track only what helps you decide.
Each week, record:
- What you shipped
- One signal (favorites/saves/replies/sales)
- One lesson
- One change for next time
That’s enough to keep your Growth Ratchet moving.
Harness the Chaos Goblin: Faster Feedback Without Burnout
The “Chaos Goblin” is the part of your brain that creates drama right when you’re about to level up.
It whispers:
- “This isn’t good enough.”
- “People will judge you.”
- “What if nobody buys?”
- “You should change your whole style.”
You don’t need to silence it. You need to stop obeying it.
Use fear as a signal: “This matters”
Fear often shows up when you’re close to shipping something real.
A helpful reframe:
- Fear doesn’t mean “stop.”
- Fear means “this is a growth moment.”
The goal is not to feel confident. The goal is to ship anyway.
The 2-lane week (Create lane + Business lane)
Burnout happens when everything feels like one giant blob.
Split it:
- Create lane (70%) = art-making, practice, building inventory
- Business lane (30%) = listings, mockups, pitching, posting, tracking
On stressful weeks:
- Go 90/10. Keep the business lane tiny, but don’t abandon it.
This keeps you from building a pile of art that never earns.
Faster feedback without emotional overload
Feedback becomes painful when you attach it to your identity.
Instead, treat it like a product experiment.
After a launch, ask:
- Did people see it? (views)
- Did it connect? (favorites/saves)
- Did it convert? (sales/replies)
Then choose one adjustment:
- clarity (title/description)
- visibility (share to one more place)
- trust (better mockups)
- offer (bundle, small bonus, better pricing)
No spirals. Just one lever.
Deliberate practice: tiny constraints that speed you up
Constraints reduce decision fatigue and help you finish faster.
Pick one constraint per week:
- 2-color palette
- 60-minute timer
- One brush style
- One subject family (only mushrooms, only cats, only florals)
- One product format (only prints this month)
You’ll be shocked how much your output improves when choices shrink.
Burnout warning signs (catch it early)
Burnout usually starts quietly:
- You avoid your workspace
- You “research” instead of making
- Every post feels heavy
- You stop sharing because it’s easier
If you notice these, don’t push harder. Adjust your plan.
The simple adjustment rule (use this immediately)
When you feel burnout building:
- Cut your weekly workload in half for 7 days
- Keep one tiny “ship” action (even if it’s small)
- Protect sleep and one restorative activity
- Return to normal after you feel steady again
Consistency survives because you didn’t break the chain.
A gentle “permission slip” that keeps you moving
You’re allowed to be a beginner. You’re allowed to launch version 1. You’re allowed to learn in public.
In fact, learning in public is often what attracts opportunities: clients, buyers, and brands don’t just buy the final art—they buy the story of a maker who ships.
And that’s where the next part of your article naturally goes: once you can reliably ship and stay consistent, you can choose the money path that fits you best—products, licensing, teaching, or services—and start turning signals into real income.
Pick Your Money Path: Passive Income, Products, Teaching, and More
You don’t need every income stream. You need one path you can stick with long enough to get signals—then you can stack a second path later.
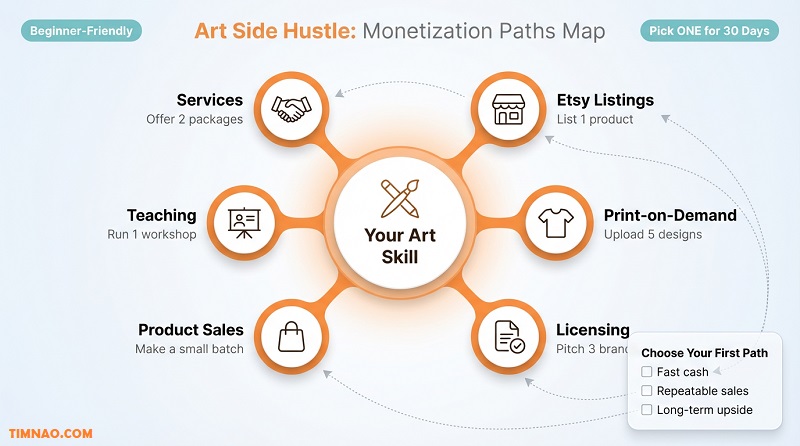
A beginner-friendly way to choose is to match your path to your current reality:
- If you want the fastest “yes” → services/commissions (you trade time for money).
- If you want repeatable sales → products (you build an asset library).
- If you want long-term upside → licensing (slower start, bigger compounding).
- If you enjoy explaining and guiding → teaching (clear outcome = easier to sell).
How to choose your first path (a 3-minute decision filter)
Score each option 1–5 (5 = best fit). Add the points.
- Time: can you do it with ~5 hours/week?
- Energy: does it feel doable (not draining) to do weekly?
- Skills: can you make a decent version now (not “someday”)?
- Access: do you know where to find buyers (even a little)?
- Shipping speed: can you launch version 1 in 30 days?
Pick the highest score and commit for 30–90 days. The commitment is what creates momentum.
Path 1: Product listings (simple, beginner-friendly sales)
What you offer: a clear product people can buy without talking to you.
Examples: digital wall art, printable planners, sticker sheets, art prints.
Where to sell:
Who buys: people searching for gifts, decor, aesthetics, and niche hobbies.
Your first steps (keep it small):
- Start with 1–3 listings, not 30.
- Use 2–3 strong images (mockup + close-up + “what you get”).
- Write a title that starts with what it is + who it’s for.
- Put the clarity in bullets (size, delivery, materials, turnaround).
- Launch, then improve based on favorites/clicks.
Time-to-first-signal (realistic):
- You may see favorites/views within a week if you’re discoverable.
- First sales can happen quickly or take longer—signals usually appear earlier than purchases.
Beginner tip: your first goal is not “quit your job.” Your first goal is proof: people click, favorite, ask questions, and buy.
Path 2: Digital downloads (low friction, high learning speed)
This is one of the easiest ways to practice the “art → offer” translation.
What you offer: a file that delivers a result.
Examples: printable art, phone wallpapers, coloring pages, templates, planners.
Who buys: people who want instant, affordable, niche-friendly products.
Where to sell:
Your first steps:
- Make one mini collection (hero + two helpers).
- Package it into a simple set (e.g., 3 prints, 5 wallpapers, 10 coloring pages).
- Create a “What you get” image that lists file sizes/types.
- Write a description that answers beginner questions:
- How do I download?
- What can I use it for?
- Is it personal use only?
Time-to-first-signal:
- Usually faster than physical because price is lower and delivery is instant.
Why it works for beginners: you don’t need inventory, shipping supplies, or a printer relationship. You can focus on learning what people want.
Path 3: Print-on-demand marketplaces (good training wheels, lower control)
Print-on-demand can be a gentle entry if you want product variety without handling shipping.
What you offer: your designs applied to products (prints, apparel, home goods).
Who buys: marketplace browsers and gift shoppers.
Where to start:
Your first steps:
- Choose 5 designs that fit a clear niche.
- Apply each design to 1–2 product types (don’t spread everywhere).
- Make clean previews and keep titles descriptive.
- Promote your best 1–2 products consistently.
Time-to-first-signal:
- Often slower unless you bring your own traffic.
- Great for building an asset library while you learn what resonates.
Important mindset: use POD as a learning and portfolio channel first, not as a guarantee of passive income.
Path 4: Licensing (slower start, serious upside)
Licensing is when a company pays to use your artwork on their products. It’s attractive because it can become recurring income, but it’s not “easy money.” It’s relationship + consistency.
What you offer: a mini collection that fits a product category.
Examples: patterns for stationery, illustrations for kids’ products, seasonal collections.
Who buys: brands that already produce goods and need artwork that sells.
Your first steps (beginner-friendly):
- Create a mini collection (3–6 coordinated pieces).
- Build a clean sell sheet in Canva:
- collection name, thumbnails, brief theme, contact info
- Make a target list of 20 brands (start small).
- Send 3–5 pitches per week for one month.
- Track:
- sent, opened/replied, follow-up date, outcome
Time-to-first-signal:
- Replies may take weeks. Deals can take months.
- Your first signals are replies, requests for more work, or “please submit to our portal.”
Beginner tip: don’t pitch “everything you’ve ever made.” Pitch one cohesive collection that matches their shelf vibe.
Path 5: Teaching (fast trust builder, repeatable income)
If you can help someone get a result in one hour, you can teach.
What you offer: a clear outcome.
Examples: “Draw cozy rooms in 60 minutes,” “Make a repeating pattern,” “Design your first sticker sheet.”
Who buys: beginners who want structure, feedback, and a shortcut.
Where to teach:
Your first steps:
- Choose one beginner result.
- Run a small live workshop (even 5 people).
- Collect feedback + one testimonial.
- Repeat monthly or record and sell as a replay.
Time-to-first-signal:
- Often quick if you already have a small audience or community.
- Signals include signups, questions, “when is the next one?”
Beginner tip: teach what you can explain clearly, not what you think looks impressive.
Path 6: Services and commissions (fastest cash, best for early confidence)
This is the quickest way to earn while you build product assets on the side.
What you offer: a packaged service with clear boundaries.
Examples: pet portraits, book cover illustration, brand icons, pattern design, custom classroom posters.
Who buys: individuals, creators, small businesses.
Where to get clients:
- Your own audience via Instagram
- Visual discovery via Pinterest
- Local communities, referrals, small business directories
Your first steps:
- Create 2–3 portfolio samples that match the service.
- Write a simple menu:
- what’s included, turnaround time, starting price, how to book
- Post an “opening slots” announcement.
- Pitch 10 leads (local businesses, creators, niche communities).
Time-to-first-signal:
- Often within 2–6 weeks if you’re actively reaching out.
Beginner tip: avoid “DM me for rates.” It creates friction and attracts the wrong buyers. Give a starting price and clear package.
How to stack paths without chaos (a simple timeline)
A clean way to grow without burning out:
- Month 1: one path only (get signals)
- Month 2: same path + one small improvement system
- Month 3: add one supportive path that reuses the same art
Example stacks:
- Products → Teaching (teach how you made the product style)
- Services → Products (fund your inventory build)
- Licensing → Products (use collections for both)
You’re not picking a forever identity. You’re picking your next best move.
From First Post to First Payment: 3 Beginner-to-Paid Scenarios
These are grounded stories you can copy. No magic. Just the S.T.A.R. cycle applied like a normal person.
Scenario 1: The first Etsy sale from a “small set” launch
Starting level: Curious Starter → Consistent Maker
What they practiced: mini collection + mockups + one listing + one improvement loop
What they did (week by week):
- Week 1: picked a niche (“cozy reading corner decor”) and finished 3 coordinated pieces
- Week 2: made 3 mockups in Canva and drafted an Etsy listing
- Week 3: launched the listing and posted 2 times on Instagram
- Week 4: checked signals and made one change (new first image + clearer title)
What they shipped:
- 1 digital wall art listing (set of 3 prints)
What turned into the first payment:
- Favorites came first, then a buyer purchased after the listing became clearer and more “giftable” in its wording.
First-signal timeline (realistic):
- Days 2–7: favorites and saves
- Days 7–21: first sale (varies, but signals show earlier)
Why it worked:
- The niche was clear.
- The product was easy to understand.
- They improved instead of disappearing after launch.
What they did next:
- Created a second listing using the same theme and added a bundle option.
Scenario 2: A licensing reply that turned into a real conversation
Starting level: Consistent Maker → First-Time Seller
What they practiced: cohesive collection + sell sheet + weekly pitches + follow-up system
What they did:
- Built a 6-piece mini collection (3 hero illustrations + 3 patterns)
- Designed a sell sheet in Canva (clean thumbnails, theme, contact info)
- Made a list of 20 brands that matched their style
- Sent 3 pitches per week and logged everything in a tracker
- Followed up after 10–14 days with a short, polite message
What they shipped:
- 12 pitches + 1 sell sheet + 1 organized portfolio folder
What turned into opportunity:
- Two brands replied asking for:
- seasonal variations
- production-ready file specs
- a quick call to discuss fit
First-signal timeline (realistic):
- Weeks 2–6: first replies
- Months 2–4: potential deal (varies widely)
Why it worked:
- They pitched art that looked like a product line, not random samples.
- They kept a consistent schedule long enough for brands to notice.
- Their email made it easy to say “yes” to the next step.
What they did next:
- Built a second collection using the feedback from the brand’s request (instant clarity for what to make next).
Scenario 3: A $15 workshop that became a repeatable monthly income stream
Starting level: First-Time Seller
What they practiced: teach one outcome + simple signup + light promotion + reuse materials
What they did:
- Chose one beginner result: “Design your first sticker sheet”
- Set up a signup form using Google Forms
- Hosted the workshop on Zoom
- Promoted with:
- 1 post + 3 stories on Instagram
- 1 reminder post
- Recorded the session and turned it into a replay
What they shipped:
- A 60-minute workshop with 9 attendees at $15 each
What turned into income:
- The live session earned immediately, and the replay sold later to people who missed it.
First-signal timeline (realistic):
- 3–10 days: signups (if promoted consistently)
- Same day: first payment
- Next month: repeat workshop with improved structure
Why it worked:
- The outcome was specific and beginner-friendly.
- They reused the same materials (less prep next time).
- Teaching created trust, which helped product sales too.
What they did next:
- Packaged the replay into a mini course on Thinkific (optional) and began building an email list with Mailchimp.
Fix These Time-Wasters: Pricing, Perfectionism, and “Ready” Syndrome
These three traps look harmless. They feel like “being responsible.” But they quietly kill momentum—and income.
Time-waster #1: Pricing from fear (instead of a simple floor)
Fear-pricing sounds like:
- “I’m new, so I should charge almost nothing.”
- “If I price higher, no one will buy.”
Here’s the truth: underpricing doesn’t just reduce profit. It can also make buyers doubt quality.
Use a simple price floor for physical products:
- Add your hard costs (printing, materials, packaging, labels).
- Add a small allowance for your time (even if it’s rough).
- Add a buffer for mistakes and replacements.
Then compare with similar products and adjust within a realistic range.
For digital products: your cost is time + value + clarity.
A beginner-friendly approach:
- Start with a simple price that feels fair
- Improve listing quality and raise later (after you have signals)
Quick pricing confidence trick:
If you’re unsure, create:
- a single item price
- a bundle price (better deal per piece)
Bundles increase average order size without needing new art.
Time-waster #2: Perfectionism disguised as “quality control”
Perfectionism keeps you busy but invisible.
Common signs:
- rewriting your brand story weekly
- redesigning your shop banner instead of listing
- “I need 20 products before I launch.”
Fix: define done (then ship)
Use a “Definition of Done” checklist and stop there:
- clear images
- clear title
- clear bullets
- clear delivery info
- one call-to-action
Your first listing is not your final form. It’s version 1.
A helpful rule:
Spend 80% of your effort on:
- making the art good
- making the offer clear
Spend 20% on: - aesthetics and extras
Clarity sells more than fancy formatting.
Time-waster #3: “Ready” syndrome (waiting for confidence)
This one is sneaky because it sounds mature:
- “I just want to be prepared.”
But readiness often means “I want a guarantee.”
There are no guarantees. There are only experiments.
Fix: run smaller tests
Instead of launching a whole shop, do:
- 1 listing
- 1 commission slot
- 1 workshop
- 3 pitches
Small tests create real feedback without overwhelming you.
Time-waster #4: Building a giant product range too early
A huge range is not a strategy. It’s usually avoidance.
Fix: go narrow, then go deep
Pick one:
- one niche
- one format
- one mini collection
Then build depth:
- color variations
- seasonal versions
- bundles
Depth helps people recognize you—and recognition drives sales.
Time-waster #5: Posting randomly (then quitting)
Random posting leads to random results. Then discouragement.
Fix: a tiny content system
Use a weekly trio:
- finished piece + who it’s for
- behind-the-scenes
- use-case / mockup / story
If you hate social media, keep it minimal—but consistent.
Time-waster #6: Not following up
Most beginners stop at “sent” or “posted.” Follow-up is where opportunities often appear.
Fix: one follow-up rule
- If you pitch: follow up after 10–14 days
- If you launch: re-share after you improve one thing
- If someone asks a question: reply quickly and clearly
Follow-up isn’t annoying. It’s professionalism.
Your very first 3 actions (next 24 hours)
- Choose your one money path for the next 30 days. Write it down.
- Create one “Definition of Done” checklist for your first offer.
- Schedule two work sessions (45 minutes each) on your calendar.
Small, specific, scheduled. That’s how this becomes real.
Closing takeaways you can actually use
- Pick one money path and commit for 30–90 days before switching.
- Ship version 1 fast enough to get signals, then improve one lever at a time.
- Clarity beats perfection: mockups + titles + bullets matter.
- Underpricing doesn’t make selling easier—it makes growth harder.
- Your “marketing” is simply showing the right work to the right people consistently.
FAQs: Beginner Questions About Art Side Hustle Answered
Do I need a big following to make my first sale?
No. A big following helps, but it’s not required.
What you need instead:
- a clear niche (who it’s for)
- a clear offer (what they get)
- a place to buy (listing, form, invoice)
- consistent outreach (even small)
A marketplace like Etsy can bring search traffic. Social platforms like Instagram can bring trust and visibility. You can start with either.
Should I sell physical prints or digital downloads first?
If you’re brand new, digital downloads are often easier:
- no inventory
- no shipping
- faster testing
Physical can work too if you:
- keep it simple (one size, one product type)
- know your costs
- don’t over-invest before you have signals
Pick what matches your energy and resources.
How do I choose a niche without boxing myself in?
Think of a niche as a starting lane, not a prison.
A flexible niche is:
- a theme + buyer identity (cozy decor lovers, teacher posters, plant gifts)
- not “I can only draw this forever”
Choose a niche for 30–90 days, learn what sells, then expand from a stronger base.
How many products should I create before opening a shop?
You can open with one—seriously.
A good beginner target:
- 1–3 listings to start
- then add one new listing per week or per month
More important than quantity:
- clear photos/mockups
- clear titles
- consistent style
What if I’m slow and can’t make a lot of art?
Then your plan should be built for your speed.
Do:
- smaller sets (1 hero + 1 helper)
- limited color palettes
- one format per month
- reuse assets (turn one illustration into multiple products)
Consistency beats speed. Five hours a week is enough to build a real pipeline.
How do I know if a design is worth turning into a product?
Use signals instead of guessing.
Good “product-worth” signals:
- saves and shares (people want to come back to it)
- repeated comments like “I need this” or “Do you sell it?”
- favorites on Etsy
- link clicks (even without sales yet)
If something gets attention, package it. If it gets none, adjust niche/format and test again.
Is fan art okay to sell?
This depends on copyright and licensing rules, and it can get risky fast. In many cases, selling fan art can violate IP rights.
A safer approach:
- create original work inspired by general themes (cozy witches, space cats, fantasy forests)
- avoid using protected characters, logos, or exact names
If you want long-term stability, build around your own worlds and motifs.
How do I price commissions without feeling awkward?
Make it a package, not a negotiation.
Include:
- what’s included (size, revisions, delivery)
- timeline
- starting price
- add-ons (extra character, background, rush fee)
It feels less awkward when you’re offering a clear productized service instead of “whatever you feel like paying.”
You can still build an art side hustle. Choose channels that match you.
Options:
- marketplace search (e.g., Etsy)
- visual discovery (e.g., Pinterest)
- email list for people who already like your work (e.g., Mailchimp)
- direct outreach (pitches, local partnerships)
Social media is a tool, not a requirement.
When should I switch from Etsy to Shopify?
Switch when you have:
- consistent sales or consistent traffic
- a repeatable product pipeline
- enough confidence to drive your own audience
A common approach:
- start on Etsy for discovery
- build your audience and email list
- move your best sellers to Shopify when you’re ready for more control
You don’t have to rush this.
I’m scared to launch—what’s the smallest possible first step?
Pick one:
- publish one listing (even if it’s not perfect)
- post one “available now” message
- send three pitches
- announce two commission slots
- host a tiny workshop for five people on Zoom
Make it so small you can’t talk yourself out of it. Then let the signals teach you what’s next.
If you’ve made it this far, you’re not missing motivation—you’re missing a repeatable loop. Pick one money path, ship one small offer, and let your Growth Ratchet do its job. Your future self will thank you for the boring consistency.
Disclaimer
This article is for educational and informational purposes only. It shares general strategies and beginner-friendly examples for building an art side hustle, but it is not financial, legal, tax, or business advice. Your results will vary based on your skills, time, niche, pricing, marketing consistency, platform changes, and market conditions.
Before making business decisions, spending significant money, or signing contracts (including licensing, commissions, and client agreements), consider consulting a qualified professional such as a lawyer, accountant, or business advisor. When working with third-party platforms (for example, Etsy, Shopify, Instagram, or Canva), you are responsible for reviewing and following their current terms, fees, and policies.
Copyright and intellectual property rules vary by country and situation. Avoid using protected characters, logos, or brand assets without permission, and seek professional guidance if you are unsure.
If this guide helped you take one real step toward your art side hustle, you can support my work by buying me a coffee ☕✨ It keeps this blog going and helps me create more practical, beginner-friendly guides (with fewer fluff and more “do this next” steps).
👉 Buy me a coffee here: https://timnao.link/coffee 💛🎨


