
LinkedIn Personal Brand: A Powerful, Surprisingly Simple Client-Getting System 💥
LinkedIn personal brand is one of the fastest, most beginner-friendly ways to turn your expertise into real opportunities—client DMs, booked calls, and steady income—without relying on cold pitching or spending all day online. In this guide, you’ll follow Tara’s realistic story and copy a simple LinkedIn content strategy that turns posts into conversations (and conversations into paid work), with clear templates and a 30-day plan you can actually stick to.
The DM that fixed a “feast-or-famine” freelance business
Tara didn’t think she had a marketing problem.
She thought she had a “client problem.”
Some months, she’d be fully booked. Other months, she’d stare at her calendar like it had personally betrayed her. When work got quiet, she’d do the usual panic sprint:
- refresh job boards
- send a few cold DMs
- underprice a project “just to get momentum”
- promise faster delivery than she could realistically manage
It worked often enough to keep her afloat… but it never built stability. It was like living paycheck to paycheck, except the paycheck depended on her mood, energy, and how much rejection she could tolerate that week.
Then one Tuesday night, after a long day of “should I post something?” procrastination, she wrote a short post on LinkedIn. Not a hot take. Not a trend. Just a simple story:
- a client had too many leads but no consistent follow-up
- Tara built a basic pipeline tracker + message templates
- the client booked calls again within two weeks
She ended the post with one honest line:
“If you want the checklist I used, comment PIPELINE and I’ll send it.”
She expected nothing.
The next day, she woke up to a DM:
“Are you taking clients? I’ve been reading your posts for a while. This is exactly what I need.”
That sentence mattered more than the retainer she signed later, because it explained why the deal was easy:
“I’ve been reading your posts for a while.”
Tara didn’t “close” the client in a DM. Her content had already done 70% of the trust-building.
That’s the core promise of a LinkedIn personal brand: you stop trying to convince strangers you’re good, and you start letting your work, thinking, and stories create familiarity before you ever speak.
What actually changed (and why it created income fast)
Tara didn’t suddenly become more talented. She changed the setup around her talent:
- She stopped posting generic tips and started posting one specific problem she solves
- She stopped hiding her offer and made a clear next step
- She stopped “posting and ghosting” and built a tiny routine to turn comments into conversations
And here’s the key: none of that required a big following.
She wasn’t trying to be famous. She was trying to be obvious to the right people.
The beginner trap: “I’ll sell later, after I grow”
If you’re new, this will sound familiar:
- “I’ll post for a few months first.”
- “I’ll build an audience, then I’ll offer something.”
- “I don’t want to be salesy.”
That mindset is exactly why many beginners post consistently and still don’t get clients on LinkedIn.
Because content without a direction becomes entertainment, not a business asset.
The fix isn’t aggressive selling. It’s clarity.
You can be helpful and still guide people toward a next step. The goal is to make it easy for the right person to raise their hand.
The “rent-paying” mindset shift
Tara started treating LinkedIn like a storefront instead of a diary.
A storefront does three things well:
- it tells people what you do
- it shows proof you can do it
- it makes the next step simple
Once she made that shift, the rest became much easier—because she wasn’t guessing anymore. She was building a small system.
And that leads to the next idea: why one post can do the work of dozens of cold pitches when you treat it like reputation-building instead of content creation.
Reputation at scale: why your posts can do the selling for you
The simplest definition of personal branding is this:
Your personal brand is what people believe about you when you’re not there.
Online platforms don’t create your reputation—they amplify it.
That’s why “reputation at scale” is such a useful mental model. It explains why two freelancers with the same skills can earn wildly different money:
- one freelancer is constantly introducing themselves
- the other freelancer is constantly being introduced
When your reputation is clear, people start doing the connecting for you.
The money math behind reputation (without the fluffy stuff)
Think about how you currently get clients:
- time spent pitching
- time spent explaining your value
- time spent overcoming skepticism
- time spent negotiating price
Now imagine a prospect arrives already thinking:
- “I get what you do.”
- “I’ve seen you talk about this problem.”
- “You seem like you know your stuff.”
That’s what reputation at scale buys you: lower friction.
Lower friction shows up financially as:
- fewer calls to land a client
- faster decisions
- less price negotiation
- more inbound referrals
- higher-quality opportunities
Not because you’re “popular.” Because you’re familiar.
A practical way to build reputation: “what do I want to be known for?”
Beginners often post whatever feels useful that day. The problem is that usefulness alone doesn’t create a brand. Consistency does.
So ask yourself:
“If a stranger reads 10 of my posts, what do I want them to believe I’m great at?”
Pick one lane. Not forever—just for the next 30–60 days.
Examples of “lanes” that attract paying work:
- turning content into sales calls
- building lightweight business systems
- improving conversion rates on landing pages
- hiring and onboarding a small team
- fixing messy operations and workflows
- building simple dashboards for founders
Then make your posts orbit that lane.
Your posts are “pre-selling” whether you want them to or not
Here’s the part many people miss:
Even if you never mention your services, your content still sells something.
It sells:
- your standards
- your way of thinking
- your taste and judgment
- what you notice (and what you ignore)
- whether you feel safe to work with
So you may as well sell intentionally.
A beginner-friendly “pre-sell checklist” for any post:
- Does this show a real problem my buyer has?
- Does it show how I think, not just what I know?
- Does it include a next step (even a small one)?
If the answer is yes to at least two, you’re building reputation that can translate into revenue.
How to avoid the “content hamster wheel”
Reputation at scale is not built by posting 100 random ideas.
It’s built by repeating a small set of ideas in a way that makes people think:
“They’re consistently good at this.”
You don’t need endless novelty. You need recognizable signal.
And once you accept that, the next step becomes obvious: if your content is going to attract attention, you need something clear to sell—without jumping straight into cold pitching.
Get clients on LinkedIn without cold pitching: the Offer Ladder
Let’s make this simple:
If someone reads your posts and thinks, “This person gets it,” what happens next?
If the answer is “nothing,” you’ve built a nice hobby.
To get clients on LinkedIn, you need an offer that matches the trust your content creates. That’s what the Offer Ladder is for.
An Offer Ladder is just a set of “yes options” that reduce friction for new prospects.
Step 1: choose one expensive problem (not a vague service)
Beginners often sell a service category:
- “copywriting”
- “virtual assistant”
- “marketing”
- “design”
- “consulting”
Those categories are too broad to trigger a confident DM.
Instead, sell a specific problem with a clear outcome.
Use this prompt:
“My buyer loses money or time when ______ happens.”
Examples:
- “Leads come in, but follow-up is inconsistent.”
- “Sales calls happen, but conversion is low.”
- “Founder is drowning in admin and decisions.”
- “Content is posted, but nothing turns into inquiries.”
When you post about an expensive problem, your content becomes more than “tips.” It becomes a mirror.
People see themselves, and that’s when they reach out.
Step 2: build a ladder with 2 rungs (beginner-friendly)
You don’t need a complicated product suite.
Start with two rungs:
Rung A: a low-friction entry offer (Audit or Mini-Assessment)
- simple deliverable: scorecard, checklist, Loom video, short report
- quick delivery: 30–90 minutes
- low commitment for the client
Rung B: a core offer (Sprint or Retainer)
- sprint: 7–14 days, one measurable outcome
- retainer: monthly support tied to a defined result
Why this works: the entry offer turns “curious” into “committed.” The core offer turns “committed” into recurring revenue.
If you want to keep it even simpler, start with:
- one Sprint (fixed scope, fixed timeline)
- one Retainer (for the people who want ongoing help)
Step 3: price the outcome, not the hours
A practical beginner rule:
- if you price hours, clients compare you to other hours
- if you price outcomes, clients compare you to the cost of staying stuck
You don’t need to be perfect at pricing on day one. You just need pricing that signals you’re selling a result.
A simple way to anchor your price without overthinking:
- What does the problem cost per month in lost time, lost leads, or stress?
- If you solve it, what’s the realistic “value swing”?
- Price your offer so the buyer still feels the upside is obvious.
Step 4: write one offer sentence you can repeat everywhere
Use this template:
“I help [person] get [result] in [timeframe] without [pain], using [method].”
Examples:
- “I help coaches get 2–4 extra sales calls per month in 30 days without cold DMs, using a simple content-to-conversation system.”
- “I help founders reclaim 5 hours per week without hiring full-time, using lightweight workflows and dashboards.”
That one sentence becomes your “north star.” It keeps your posts focused and your CTA natural.
Step 5: add a soft CTA that doesn’t feel pushy
Beginners hear “CTA” and think they need to sound like an ad.
You don’t.
You can use simple, permission-based CTAs like:
- “If you want the checklist, comment PIPELINE and I’ll send it.”
- “If you’re dealing with this, DM me FIX and I’ll ask two questions.”
- “Want a quick scorecard for this? Comment AUDIT.”
These CTAs work because they’re specific and low pressure.
And once you have an offer ladder and a CTA, you need one more thing to keep you consistent: a mission statement that stops random posting and turns your content into a strategy.
Your mission statement: the one sentence that stops random posting
Most people don’t fail at LinkedIn because they’re bad writers.
They fail because they can’t stay consistent long enough for trust to compound.
And the reason consistency is hard is surprisingly simple:
They don’t know what they’re building.
A mission statement fixes that. It’s a one-sentence compass that answers:
“What am I here to do, and who am I doing it for?”
The mission statement format that actually helps
Use this beginner-friendly template:
“I will [action] by [skills] to [result].”
Examples:
- “I will help service founders build a client pipeline by packaging their expertise into clear offers and conversion-focused content.”
- “I will help busy founders reduce operational chaos by building simple systems their team will actually use.”
Notice what this does:
- it makes your brand directional
- it reduces decision fatigue
- it makes your content feel cohesive
How to write yours in 10 minutes
Do this quick exercise:
- Write 3 things people ask you for help with
- Write 3 skills you can deliver confidently
- Write 1 result you want to be known for creating
Now combine them into one sentence.
If you get stuck, keep it plain. Clarity beats cleverness every time.
How the mission statement increases revenue (practically)
A mission statement isn’t motivation. It’s operational.
It helps you:
- decide what posts to write
- decide what clients to accept
- decide what offers to build
- stay consistent when engagement is low
That last part matters because beginners often quit right before the compounding starts.
If your mission statement is clear, you can treat LinkedIn like brushing your teeth: not a dramatic event, just a routine that protects your future.
A tiny “content filter” you can use immediately
Before you publish a post, ask:
- Does this support my mission?
- Does this connect to my offer ladder?
- Does this help the right person take a next step?
If the post fails all three, it’s probably not building your business.
And once you’ve got the mission, you still need a practical way to generate ideas without staring at a blank page. That’s where content pillars come in.
Core content pillars: the “never run out of ideas” cheat code
If you’ve ever thought, “I don’t know what to post,” you don’t need inspiration.
You need structure.
Content pillars are just categories you repeatedly talk about so people learn what you’re known for.
For beginners, the easiest setup is two pillars:
- Expertise pillar: what you help with
- Story pillar: why you help with it, what you’ve learned, what you notice
This combination keeps your content useful without feeling robotic.
Build your pillars in 15 minutes (no overthinking)
Start with your lane:
“I help ______ with ______.”
Now create 3 subtopics under each pillar.
Pillar 1: Expertise (3 subtopics)
Pick areas that lead directly to your offer.
Examples for a “get clients on LinkedIn” offer:
- offer clarity and positioning
- content that converts (not just reaches)
- turning comments into DMs
Pillar 2: Story (3 subtopics)
Pick personal angles that reinforce credibility.
- lessons from client work
- mistakes you made and fixed
- behind-the-scenes systems you use
That’s already 6 buckets. If you post 3 times a week, you’ve got two weeks of content without inventing anything new.
The 3 post types that make pillars convert (not just entertain)
A lot of people create pillars, then still post in a way that doesn’t lead anywhere.
To keep your pillars revenue-friendly, rotate these formats:
1) Problem-cost posts
- “If you’re dealing with X, it’s costing you Y.”
These create recognition and comments.
2) Process posts
- “Here’s my 5-step method to fix X.”
These build authority.
3) Proof posts
- “Here’s what changed when we did X.”
These remove doubt and invite DMs.
If you’re unsure what to write tomorrow, pick one pillar and one post type. That’s it.
How to make your writing feel human (not like a content machine)
Beginners often try to sound “professional,” which accidentally makes them sound like a template.
Instead, write like a person who’s explaining something to a smart friend.
A simple trick: add one line that only you could write.
For example:
- “I learned this the hard way when I tried to do it the ‘clean’ way first.”
- “This sounds small, but it’s the difference between ‘busy’ and ‘booked’.”
- “If your brain is already tired, start here—don’t try to fix everything at once.”
That’s how you keep your posts readable and credible.
A weekly posting plan beginners can actually maintain
Here’s a simple 3-post rhythm:
- Monday: Problem-cost (call out the pain)
- Wednesday: Process (show your method)
- Friday: Proof/story (show results or learning)
Then add one soft CTA once per week:
- “Comment PIPELINE and I’ll send the checklist.”
This is a real LinkedIn content strategy because it’s repeatable. It doesn’t depend on mood.
And most importantly, it builds a bridge from content to income—without needing cold pitches to start.
The ring of influence: the shortcut to higher-quality leads
If you’ve ever thought, “My ideal clients are too busy to notice me,” you’re probably right.
But that doesn’t mean you’re stuck.
Most buying decisions on LinkedIn don’t happen in a vacuum. Even when one person signs the contract, there’s usually a small circle around them shaping the decision. That circle is your shortcut.
That’s the ring of influence: the people who influence the buyer, support the buyer, or get asked, “Do you know anyone who can help with this?”
Think:
- operations managers
- executive assistants
- heads of marketing
- team leads
- recruiters
- chief of staff
- sales enablement
- project managers
Tara noticed something after her first inbound DM: the person who referred her wasn’t the founder. It was the founder’s marketing lead who’d been quietly collecting solutions to bring into a meeting.
That’s the pattern.
Why the ring of influence converts better than random “leads”
Leads from the ring of influence tend to be:
- warmer (they already trust the person who shared your post)
- more specific (they often come with a clear problem and context)
- less price-sensitive (they’re solving an internal headache, not browsing)
- faster-moving (they’re trying to fix something now, not “someday”)
In practical money terms: fewer time-wasting chats, more real calls.
How to map your ring of influence in 10 minutes
Open a blank note and answer these three questions:
- Who signs? (the buyer)
- Who feels the pain first? (often not the buyer)
- Who gets asked for recommendations? (internal or external)
Now choose 3 roles to write for.
Example for a freelancer who helps with “get clients on LinkedIn” systems:
- Buyer: founder / agency owner
- Ring roles: marketing manager, sales lead, content strategist
Example for an ops/system freelancer:
- Buyer: founder
- Ring roles: executive assistant, ops manager, team lead
The goal is to create posts that make the ring of influence look smart for forwarding it.
Use one of these “shareable” frames:
- The checklist frame
“If you’re the person responsible for fixing this internally, here’s the checklist I use.” - The script frame
“If you need to explain this issue to a founder, here’s the exact wording that works.” - The ‘what to do first’ frame
“If this is a mess right now, don’t overhaul everything. Start with this one change.” - The ‘avoid the trap’ frame
“If you try to solve this with X, you’ll waste 3 weeks. Do Y instead.”
These posts don’t scream “hire me.” They quietly signal, “I understand what you’re dealing with.”
And they get shared because they help someone internally do their job better.
A beginner-friendly posting ratio that keeps your positioning clear
A common fear is: “If I write for assistants/managers, won’t I confuse my brand?”
Not if you keep the ratio sane.
Try this for 30 days:
- 70% posts for the buyer (direct decision-maker)
- 30% posts for the ring of influence (referrers and internal champions)
This widens your entry points without changing what you sell.
The smooth transition is simple: once you know who can refer you, you stop writing “for everyone.” You write for the people who can actually move opportunities toward you.
LinkedIn content strategy that turns comments into calls
Most beginners hear “LinkedIn content strategy” and think they need more content.
They don’t.
They need content that creates conversations, because conversations are what lead to clients.
Tara’s turning point wasn’t “posting more.” It was building a simple pipeline:
Post → comments → DM → call → paid offer
That’s it.
Here’s the exact way to build that pipeline without feeling salesy.
The 3 post types that create buying intent
A lot of posts get likes and still don’t get clients. Usually because they’re interesting, not activating.
Tara rotated three types of posts that naturally invite the right person to respond.
1) Problem–cost posts (help people recognize themselves)
These posts name the problem and make the cost obvious.
Template:
- “If you’re dealing with X, it’s costing you Y.”
Examples:
- “If you’re posting consistently but getting zero inquiries, it’s costing you time, confidence, and momentum.”
- “If leads land in your inbox but follow-up is messy, you’re leaking revenue.”
Why it works: people comment because they feel seen.
2) Process posts (prove you have a method)
These posts show how you think in steps.
Template:
- “Here’s the 5-step system I use to fix X.”
Keep it beginner-simple:
- diagnose the bottleneck
- pick one offer
- build a proof pack
- write 3 conversion posts
- run a comment-to-DM loop
Why it works: it signals competence without bragging.
3) Proof posts (remove doubt)
Proof isn’t just “big numbers.” Proof is any clear before/after.
Examples of beginner-proof:
- “Before: 0 inbound DMs → After: 3 warm inquiries in 2 weeks”
- “Before: hourly chaos → After: a fixed-scope sprint clients say yes to”
- “Before: random posting → After: a weekly content loop that converts”
Proof posts work because they answer the buyer’s silent question: “Will this work for me?”
How to write posts that get comments from the right people
A good comment is a signal: “I’m dealing with this.”
So your post should include a gentle invitation.
Use one of these prompts at the end:
- “Which part of this is hardest for you right now?”
- “If you’ve tried this before, what got in the way?”
- “Want me to share the checklist I use?”
Notice the difference: you’re not begging for engagement. You’re opening a helpful conversation.
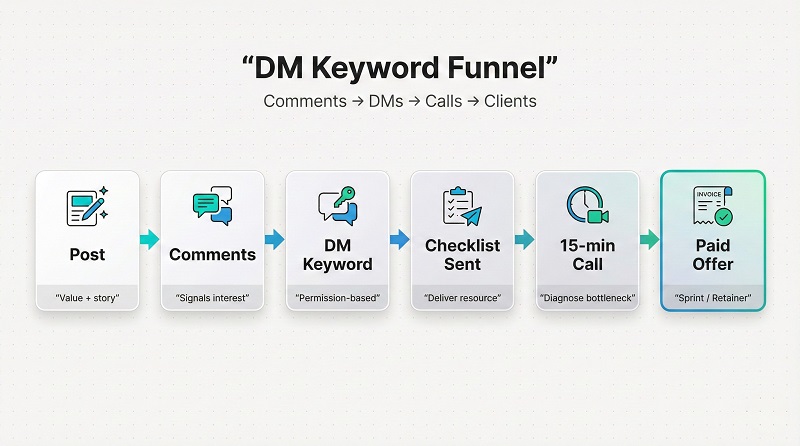
The DM keyword funnel (a clean, non-cringe conversion tool)
This is the simplest way Tara turned engagement into pipeline.
Once per week, she ended a post with a keyword CTA:
- “Comment PIPELINE and I’ll send the checklist.”
Then she followed a 3-message DM flow:
- Deliver the resource
“Got you. Do you want the checklist as a Google Doc or PDF?” - Ask one context question
“Quick question so I send the right version—what are you selling right now?” - Offer a small next step
“If you want, share your current situation in 2 lines and I’ll point out the main bottleneck.”
If they respond with a real problem, that’s your opening for a call.
You can book it via Calendly with a simple line:
“If it’s helpful, we can do a 15-minute call and I’ll map the fastest fix.”
Comment-to-call without being pushy: the “micro yes” rule
Beginners often jump too fast:
- comment → “Want to hire me?”
That feels abrupt.
Instead, Tara used “micro yes” steps:
- yes to a checklist
- yes to one question
- yes to a quick review
- yes to a short call
- yes to a paid sprint
Each micro yes reduces pressure and increases trust.
And when someone finally says yes to a paid offer, it feels natural—because it’s the next logical step, not a sudden pitch.
One practical note for 2025 behavior (so you don’t overthink timing)
LinkedIn has been heavily leaning into relevance, which means evergreen posts can resurface and still get traction later. Translation: don’t treat a post like it “failed” after one day.
Your job is to make it:
- clear
- skimmable
- useful
- easy to respond to
That’s a strategy you can actually sustain.
The engagement loop: how to “seek friends, not followers” (and still make money)
“Seek friends, not followers” sounds like a quote you’d see on a mug.
But Tara treated it like a business principle.
Because friends do three things followers don’t:
- they reply
- they DM
- they refer
And referrals are the cleanest kind of lead.
The beginner misunderstanding: “engagement” means “more comments”
Not quite.
You don’t need more comments from random people.
You need more comments from:
- your buyer
- your ring of influence
- people with the pain you solve
So the goal isn’t engagement for its own sake. It’s signal-rich engagement.
The 15-minute daily engagement routine (that compounds)
Tara kept it simple and boring—which is exactly why it worked.
Every day, she did:
- 5 minutes: reply to comments on her own posts
- answer thoughtfully
- ask one follow-up question
- keep threads alive
- 5 minutes: leave 5 quality comments on other people’s posts
- not “great post”
- add an insight, a mini story, or a helpful step
- be specific
- 5 minutes: follow up in DMs (only where invited)
- deliver promised resources
- ask one context question
- offer a small next step
This routine did two big things:
- it trained LinkedIn to see her as part of real conversations
- it trained people to see her as a real human, not a broadcaster
How to write comments that attract the right people
Here are three comment formats that work well for beginners:
- Add a missing step
“This is great. One thing I’d add is ___ because it prevents ___.” - Share a tiny case
“I saw this with a client last month—when we did ___, the result was ___.” - Ask a smart question
“Curious—do you think this changes when the audience is ___?”
When you comment like this, two things happen:
- the original poster notices you
- other readers click your profile
That’s “soft distribution” without extra posting.
The “friend-first DM” that doesn’t ruin your reputation
Tara used a DM style that feels like a continuation of a conversation, not a cold pitch.
Template:
“Hey—saw your comment on my post. Want the checklist I mentioned? No pitch, just helpful.”
If they say yes, you send it. Then you ask one context question.
That’s it.
You’re not trying to close in a DM. You’re trying to start a relationship that can lead to a call when the timing is right.
Why this loop makes money (even with a small audience)
Let’s keep it real:
You don’t need 50,000 followers to earn well.
If you build a circle of 200–500 relevant people who actually recognize you, you can create:
- monthly inquiries
- warm intros
- repeat clients
- partnerships
This is why “friends, not followers” isn’t fluffy. It’s a strategy for building income without constant outbound grind.
What Tara learned after the first client win
The first win feels like the finish line.
It’s not.
It’s data.
Tara learned more from her first inbound client than from months of posting—because the win revealed what was actually working.
Here are the lessons she wrote down (and reused immediately).
Lesson 1: Clarity beats charisma
Her best-performing posts weren’t clever.
They were clear.
They made it easy to understand:
- who the post was for
- what problem she solves
- what to do next
When she tried to sound “smart,” engagement went down. When she wrote like a real person, engagement went up.
Practical takeaway: write for one person, not an audience.
Lesson 2: Proof doesn’t need to be perfect—just specific
At first, Tara thought proof meant huge numbers.
But her audience responded most to small, specific outcomes:
- “Here’s what we changed in the first 48 hours.”
- “Here’s the one template that unlocked replies.”
- “Here’s why the old process failed.”
Specific beats impressive.
Practical takeaway: collect proof as you go. Don’t wait.
Lesson 3: The offer is the engine; content is the fuel
When Tara posted without a clear offer, people said “nice post” and moved on.
When she posted with a clear offer and a clear next step, people raised their hands.
Practical takeaway: build one offer you can repeat for 30 days.
Lesson 4: The best clients arrive through context
The client who DMed her didn’t say, “How much do you charge?”
They said, “This is exactly what I need.”
That happens when your content gives context:
- the situation
- the stakes
- the solution
- the outcome
Practical takeaway: write posts that tell a mini story, not just a tip.
Lesson 5: Boundaries create better clients
After her first win, Tara got a few “can you just…” messages.
She realized quickly: content attracts attention, but boundaries protect your time.
So she wrote a simple rule:
- “I only take on clients who want X outcome, delivered through Y process.”
Practical takeaway: being specific reduces bad-fit leads.
That’s how a personal brand becomes sustainable—not just visible.
How beginners can apply this in real life (four common scenarios)
Here’s the part that matters most: what you do next week.
Pick the scenario that matches your situation, then follow the steps exactly. Don’t mix everything at once.
If you’re starting with no audience
Your job is to become understood, not viral.
What to do (next 14 days):
- Choose one expensive problem you can solve
- Create one entry offer (audit or sprint)
- Post 3x/week using:
- 1 problem–cost post
- 1 process post
- 1 proof post (even from your own project or a friend’s business)
- Add one keyword CTA per week:
- “Comment PIPELINE for the checklist.”
What to track:
- DMs started
- calls booked
- paid audits/sprints
Fast win path: one paid audit → one proof post → raise price slightly → repeat.
If you have a small audience but no leads
This is usually a conversion issue, not a content issue.
What to do (next 7 days):
- Write a pinned offer post that includes:
- who you help
- what outcome you deliver
- how it works (1–3 bullets)
- how to start (DM keyword)
- Add one “proof asset” to your profile:
- a mini case post
- a short testimonial
- a before/after story
- Run one keyword CTA this week and respond fast.
What to track:
- profile visits
- DMs from the CTA
- call requests
Fast win path: tweak offer clarity → run CTA weekly → collect proof quickly.
If you’re a freelancer/creator who’s tired of hourly work
Your job is packaging.
Hourly pricing makes you easy to compare. A packaged outcome makes you easier to choose.
What to do (next 14 days):
- Create a sprint offer:
- timeline: 7–14 days
- outcome: one clear result
- scope: what’s included, what’s not
- Publish a 3-post conversion sequence:
- post 1: problem–cost
- post 2: process
- post 3: proof + CTA
- Create a simple payment flow via Stripe.
What to track:
- sprint inquiries
- sprint closes
- conversion to retainer
Fast win path: 2 sprints/month can stabilize income while you build inbound.
If you’re running a small service business
Your job is to build brand equity that raises deal size.
What to do (next 30 days):
- Pick one flagship offer (don’t promote everything)
- Build a small proof pack:
- 3 mini case stories
- 10 before/after bullets
- 1 simple process diagram (use Canva if you want)
- Publish 2–4 posts/week:
- 1 buyer post
- 1 ring-of-influence post
- 1 proof post
- (optional) 1 process post
- Run a weekly keyword CTA and book calls via Calendly.
What to track:
- qualified DMs
- calls booked
- average deal size
Fast win path: proof + process content typically increases close rate and reduces negotiation.
Your 30-day sprint: a predictable pipeline (without living on LinkedIn)
By now, you’ve got the pieces: a clear offer, a simple content strategy, and a way to turn comments into conversations. The only thing left is the part that actually changes your income: putting it on a calendar.
This 30-day sprint is designed for beginners who want a predictable pipeline without spending their whole life on LinkedIn. You’re going to build momentum with small, repeatable actions—not heroic bursts of energy.
What you’re building (in plain English)
Over 30 days, you’ll build:
- A clear “what I do” message (so people understand you fast)
- A proof pack (so you don’t have to “convince” people)
- A weekly posting rhythm (so you don’t burn out)
- A comment-to-DM system (so engagement turns into calls)
- A simple tracker (so you measure what matters)
And the goal is not “go viral.” The goal is: 1–3 real client conversations per week that can turn into paid work.
Before you start: set your “minimum viable routine”
Pick a routine you can actually keep.
A solid beginner default is:
- Posting: 3 times per week
- Commenting: 10 meaningful comments per day (10–15 minutes)
- DMs: 10 minutes per day (only follow-ups and keyword requests)
That’s it. If you do more, great. But don’t plan a life you won’t live.
Days 1–3: build the foundation that converts
Day 1: lock your one-liner and offer
- Write your one-sentence offer (use your template).
- Pick your offer ladder for this sprint:
- One entry offer (Audit or Sprint)
- One core offer (Sprint or Retainer)
- Decide your “DM keyword” for the month (one word, always the same).
Quick examples:
- Keyword: PIPELINE (for lead systems)
- Keyword: AUDIT (for a profile/content audit)
- Keyword: FIX (for a process checklist)
Day 2: build your “Proof Pack” (the faster-than-portfolio version)
Create one simple page (in a doc tool like Google Docs or Notion) with:
- 3 mini case stories (each 6–10 lines)
- 10 “before → after” bullets
- 1 short “how I work” section (5 bullets)
- 1 clear CTA (how to start)
If you don’t have client work yet, use:
- a personal project
- a volunteer win
- a “practice case” where you solve your own problem and document it
People don’t need your life story. They need evidence you can solve a problem.
Day 3: fix your profile only for conversion (not perfection)
This is the 20-minute version:
- Headline: who you help + outcome
- About section: 5–8 skimmable lines, including your offer and keyword
- Featured section: pin one proof post (or your proof pack doc)
Don’t turn this into a week-long rebrand. Your profile is a bridge, not a thesis.
Days 4–7: publish your first conversion sequence
This week is about creating your first “mini funnel” on LinkedIn.
Day 4: post #1 (problem-cost)
Goal: attract the right people and invite comments.
End with a simple question:
- “Which part of this is hardest for you right now?”
Day 5: comment day (distribution without posting)
Leave 10 thoughtful comments on posts your buyer reads.
Use one of these comment styles:
- Add a missing step
- Share a tiny case
- Ask a smart question
Day 6: post #2 (process)
Goal: show your method.
Write a step-by-step framework that feels usable.
End with:
- “Want the checklist version? Comment PIPELINE.”
Day 7: follow up + DM delivery
Send the checklist to everyone who commented your keyword.
Use a simple DM flow:
- “Do you want it as a Google Doc or PDF?”
- “What are you selling right now?”
- “If you want, share your situation in 2 lines and I’ll point out the bottleneck.”
Your goal isn’t to close in DMs. It’s to earn a “micro yes” and invite a call naturally.
Week 2: make it repeatable (and stop reinventing ideas)
Week 2 is when most beginners quit because they think they’ve “run out of content.”
You haven’t. You just need a structure.
Your Week 2 posting plan
- Post #3: proof story (before → change → after)
- Post #4: ring-of-influence checklist (for referrers)
- Post #5: “mistakes” post (what not to do, and why)
Your Week 2 CTA rhythm
- 1 keyword CTA only (don’t overuse it)
- 1 soft CTA: “If this is your situation, DM me FIX.”
Your Week 2 call goal
Book 2–4 short calls (15–20 minutes).
Keep the call simple:
- 5 minutes: understand the situation
- 10 minutes: diagnose the bottleneck
- 5 minutes: propose the next step (audit/sprint/retainer)
If you want a clean booking flow, use Calendly.
Week 3: turn conversations into paid offers
This is where people get nervous, because it feels like “selling.”
Here’s the trick: you’re not pitching out of nowhere. You’re offering the next logical step after you’ve already helped.
Your Week 3 move: send the “two-option” message
When someone has a real problem, reply with:
“Based on what you shared, I’d do one of two things:
- A quick Audit (deliverable in 48 hours)
- A Sprint (we implement in 7–14 days)
Want me to explain both in 2 lines?”
This feels collaborative, not aggressive.
Make payment frictionless
For entry offers, a payment link can save awkward back-and-forth.
Use something like Stripe payment links so a “yes” turns into money quickly.
Week 4: tighten the loop and raise quality
Week 4 is optimization:
- Keep the content simple
- Improve your conversion points
- Filter leads more aggressively
Do these 3 improvements
- Rewrite your pinned offer post so it’s shorter and clearer.
- Add one new proof asset from the month (a testimonial, a before/after, a story).
- Update your checklist based on what people asked in DMs.
Your Week 4 goal
- 1–2 closed offers (audit/sprint)
- 1 strong testimonial or proof story
- A repeatable weekly routine you can maintain
If you hit that, you’ve built something most people never build: a personal brand that creates pipeline without constant cold outreach.
The money leaks: mistakes that waste time, trust, and leads
Most LinkedIn “failure” isn’t about talent. It’s about leaks.
You can post consistently and still struggle if your system is leaking trust, clarity, or next steps.
Here are the most common money leaks—and the clean fixes.
Mistake 1: Posting without an offer (so nothing converts)
If your content never points to a next step, the right people may still like you… and then do nothing.
What it costs you
- Lost inbound inquiries
- More time chasing clients elsewhere
- A slower income ramp
The fix
- Choose one offer for 30 days
- Mention it naturally in your content
- Use one keyword CTA per week
Mistake 2: Being “helpful” but invisible (too generic to remember)
Generic advice attracts generic audiences.
It feels safe, but it makes you forgettable.
What it costs you
- Low-quality engagement
- Fewer DMs from serious buyers
- Constant content pressure
The fix
Pick one lane and repeat it with different angles.
Use specifics:
- a niche
- a situation
- a number
- a timeframe
- a real example
Mistake 3: Over-optimizing the profile and under-building proof
Beginners hide in “profile optimization” because it feels productive.
It is productive… for one day.
Proof creates trust for months.
What it costs you
- Weeks of “tweaking” with no pipeline
- More skepticism on sales calls
- Lower pricing power
The fix
Build a proof pack in 48 hours:
- 3 mini cases
- 10 before/after bullets
- 1 process outline
Mistake 4: Posting, then disappearing (no engagement loop)
LinkedIn is a conversation platform.
If you post and leave, you miss the part where relationships form.
What it costs you
- Lost momentum on posts
- Missed DMs from warm leads
- Slower trust building
The fix
Make it boring:
- 10 minutes to reply to comments after you post
- 10 minutes daily to comment on others
- 10 minutes daily to deliver keyword resources
Mistake 5: Trying to “scale” before you can repeat
Automation is tempting: scheduling tools, templates, AI outputs.
But if you don’t have a working system yet, scaling just makes the wrong thing louder.
What it costs you
- Inconsistent tone (people can tell)
- Lower trust
- Wasted weeks
The fix
Prove your loop first:
Post → comments → DM → call → offer.
Once that works, then you can speed it up with tools.
Mistake 6: Weak boundaries (scope creep and free consulting)
When your positioning is fuzzy, people ask for “just one quick thing.”
You become a free help desk.
What it costs you
- Time and energy leakage
- Resentment
- Less capacity for paid work
The fix
Use one boundary sentence:
“I’m happy to help, but the best next step is a paid Audit. It’s quick, and you’ll get a clear action plan.”
Then stop talking.
Three mini-variations you can copy this week
You don’t need the “perfect” plan. You need a plan that fits your life.
Here are three variations you can copy immediately.
Variation 1: The student or career switcher (no portfolio, no audience)
Goal: earn proof before you earn big money.
What to do this week
- Pick one micro-problem you can solve:
- resume clarity
- interview prep
- simple content writing
- basic research
- Create a $49–$99 audit offer with a clear deliverable.
- Post 2 times:
- one “learning” post (what you discovered and how)
- one checklist post with a keyword CTA
Money path
- Paid audits → proof → higher pricing → bigger offers
Variation 2: The busy parent or full-time employee (30 minutes a day)
Goal: build pipeline without burning out.
Your weekly rhythm
- 2 posts per week (problem + proof)
- 10 comments per day (5 minutes in the morning, 5 at night)
- One keyword CTA every other week
Your offer
- A fixed-scope Sprint you can deliver on weekends
- Or an Audit you can deliver in one evening
Money path
- 1 sprint/month can become consistent side income without chaos
Variation 3: The experienced freelancer raising rates (quality over volume)
Goal: fewer clients, higher revenue.
What to do this week
- Rewrite your offer around one premium outcome.
- Publish one proof post that includes:
- the situation
- the change
- the result
- the trade-off you managed
- Add one “how I think” post:
- explain how you diagnose problems and make decisions
Money path
- Better positioning → better-fit leads → less negotiation → higher retainers
If you only have 20 minutes today, do these 5 moves
If you’re overwhelmed, don’t try to “build a brand.”
Do one small action that creates momentum.
Here are five moves that work even on a busy day.
Move 1: Write your one-sentence offer
Use:
“I help [person] get [result] in [timeframe] without [pain], using [method].”
Save it somewhere you can paste quickly.
Move 2: Create a 10-bullet checklist you can DM
A checklist is the easiest “value exchange” on LinkedIn.
Keep it simple:
- 7–12 bullets
- one page
- practical steps
Move 3: Draft a proof story (before → change → after)
Write 6 lines:
- What was happening
- Why it mattered
- What you changed
- What improved
- What surprised you
- What someone can copy
Move 4: Leave 10 thoughtful comments in your niche
Comments are distribution.
Pick 10 posts your buyer is likely reading and leave comments that add something real:
- a missing step
- a tiny case
- a smart question
Move 5: Set one keyword CTA for your next post
End your next post with:
“Comment PIPELINE and I’ll send the checklist.”
Then follow through when people comment.
Small actions compound because they build a habit—and habits build pipeline.
Quick answers + your next moves
“How many posts do I need before I get clients on LinkedIn?”
There’s no magic number, but the pattern is predictable:
- If your offer is clear and you engage daily, you can start conversations within 2–3 weeks.
- Clients come from conversations, not post count.
Your job is to publish consistently enough that the right people recognize you.
“Do I need video?”
No.
Text works. Carousels can work. Video can work.
Start with what you’ll actually do consistently.
If you want visuals without overthinking, simple graphics in Canva are enough.
“Can I use AI without sounding robotic?”
Yes, but treat AI like an assistant, not the author.
A simple workflow:
- Use ChatGPT to outline or simplify your idea.
- Add your real story, your opinion, your examples.
- Read it out loud once. If it sounds like a brochure, rewrite one paragraph in your own voice.
“What should I track each week?”
Keep it boring and revenue-linked:
- DMs started
- Calls booked
- Offers sent
- Deals closed
Likes are not useless, but they’re not the point.
“What if people ask for free help?”
Be kind, then be clear:
- “Happy to share a quick tip here.”
- “If you want a full plan, the best next step is a paid Audit.”
If you don’t protect your time, your brand becomes a magnet for free consulting.
Your next best move (choose one, do it today)
If you want this to feel real (not theoretical), pick one:
- Build your proof pack in a doc tool and pin it on LinkedIn.
- Write and publish your first problem-cost post with a keyword CTA.
- Do the 15-minute engagement routine for 7 days straight.
- Package your first Sprint offer and set a payment link via Stripe.
Then repeat for 30 days.
That’s how a LinkedIn personal brand becomes a predictable pipeline—without turning your life into constant posting.
Disclaimer
This article is for educational and informational purposes only. It is not financial, legal, tax, or professional advice.
Any examples, stories, and numbers mentioned (including income results, client counts, conversion rates, or timelines) are illustrative and may not reflect typical outcomes. Your results will depend on factors such as your skills, experience, niche, offer quality, consistency, market demand, and how you apply the strategies.
LinkedIn features, policies, and algorithm behavior can change over time. Always follow LinkedIn’s current terms and guidelines, and use ethical, permission-based communication when engaging with others.
You are responsible for your own decisions, actions, and outcomes. If you need personalized advice, consult a qualified professional for your situation.
If this guide helped you take even one step closer to getting clients on LinkedIn, you can support my work by buying me a coffee ☕️😊
It helps me keep publishing practical, beginner-friendly playbooks like this (and updating them as LinkedIn changes) 🚀
👉 Buy me a coffee here: https://timnao.link/coffee


For the reason that the admin of this site is working, no uncertainty very quickly it will be renowned, due to its quality contents.