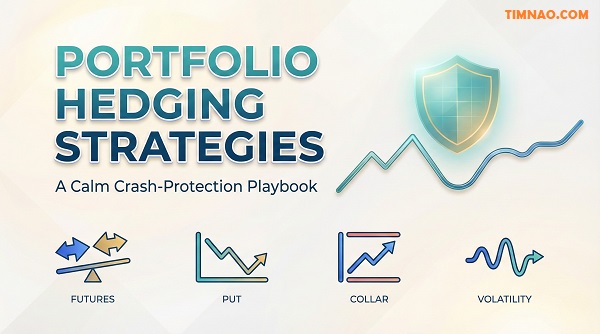
Portfolio hedging strategies: a calm, powerful crash protection playbook 🛡️
If you’ve built an investing habit, market drops don’t just hurt your account—they mess with your decisions. A hedge is basically “pay a small, controlled cost (or accept a trade-off) to avoid a big, uncontrolled loss.”
This guide is for beginners who already own a stock-heavy portfolio (like broad index ETFs) and want portfolio hedging strategies that are realistic to execute, not hype, and designed to help you stay in the game during crises.
It’s based on research that stress-tested multiple standardized derivatives strategies across twelve historical crisis scenarios and compared them using both return and downside risk measures (drawdown, VaR, cVaR, downside deviation).
Educational only. Derivatives can amplify risk if used incorrectly. If you’re not comfortable with options/futures mechanics, start with smaller size or paper trading.
What you’re really buying when you hedge: drawdown, VaR, and peace of mind
When people hear “hedge,” they often assume it’s a way to profit in a sell-off. Sometimes it does. But the core purpose is simpler:
A hedge is a tool that improves your worst-case outcome.
You’re buying a smaller maximum drawdown (the pain meter)
Maximum drawdown is the largest peak-to-trough decline your portfolio experiences. It matters because deep drawdowns create two problems at once:
- Math problem: a big loss requires an even bigger gain to recover.
- Behavior problem: deep losses trigger panic decisions (selling low, stopping contributions, revenge trading).
If a 20–30% portfolio drop would make you quit investing, your portfolio isn’t “wrong”—it’s just not designed for your real-life emotions. Hedging is one way to redesign the experience.
You’re buying tail-risk protection (VaR and cVaR, explained like a human)
Crashes aren’t just “more volatility.” They’re often fat-tail events: rare outcomes that are far worse than normal.
- VaR (Value-at-Risk): a rough estimate of “how bad could it get” over a period, at a chosen confidence level.
- cVaR (Conditional VaR): what the average loss looks like if you’re already in the worst outcomes.
You don’t need to calculate VaR at home to use the insight. The practical takeaway is:
- In calm markets, losses cluster in a small range.
- In crises, losses can jump to a much larger range.
- A hedge aims to shave those extreme outcomes.
You’re buying decision-time (peace of mind that leads to better moves)
This is the underrated benefit. During a crash, the “correct” actions usually feel wrong:
- keep investing on schedule
- rebalance (buy what fell)
- avoid selling your long-term assets in a panic
A hedge can act as a psychological circuit breaker. If you know your downside is partly buffered, you’re more likely to stick to your plan.
You pay with one (or more) of three currencies
Every hedge costs something. Usually it’s one of these:
- Premium (options): you pay upfront; time decay is the “insurance bill.”
- Upside cap (collars/call selling): you reduce gains in strong rallies.
- Cash-flow complexity (futures): margin and daily mark-to-market.
Beginner truth: the “best” hedge isn’t the one with the fanciest payoff diagram. It’s the one you can hold without stress and explain in one minute.
Quick self-check before you hedge
Write answers in plain English:
- What drop am I trying to survive (10%, 20%, 40%)?
- How long do I want protection (2 weeks, 3 months)?
- Am I okay paying a visible cost, or do I prefer capping upside?
- Do I have spare cash for margin swings?
If you can’t answer these, you’re not ready to hedge yet—you’re still shopping for comfort.
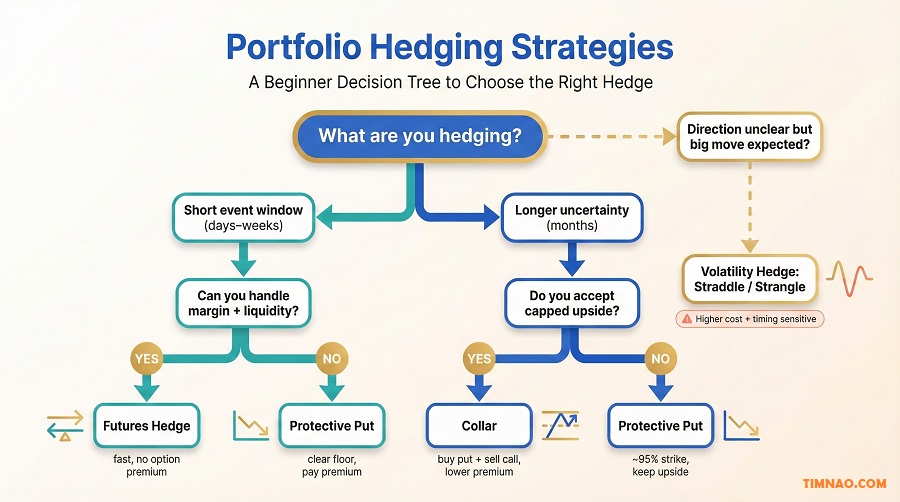
A beginner’s decision tree for portfolio hedging strategies
You don’t need dozens of strategies. You need a repeatable way to choose one strategy that fits your situation.
Step 1: Is this a short “event window” or a longer “rough season”?
- Event window (days–weeks): election week, a central bank decision, a major catalyst, or you’re temporarily anxious.
- Rough season (months): uncertainty may last, and you want protection you can hold without constant adjustments.
Short windows favor tools you can turn on/off quickly. Longer windows favor structured tools you can roll on a schedule.
Step 2: Are you hedging a crash, or hedging uncertainty?
- Crash hedge (directional): you mainly fear a drop.
- Uncertainty hedge (direction-unknown): you expect big swings either way.
If you’re a beginner, default to directional crash hedges. They’re easier to understand and manage.
Step 3: Do you insist on keeping unlimited upside?
This one decision prevents a lot of regret.
- Unlimited upside required: you’ll usually pay premium (protective puts).
- Okay capping upside: you can reduce costs (collars).
- Want strong crash protection without premium: consider a futures hedge, but accept margin/cash-flow realities.
Step 4: Set a hedge budget you won’t resent
Pick a number you can pay without constantly second-guessing. Even a small budget can make a big emotional difference.
Two practical beginner approaches:
- Per-window budget: “I’ll spend up to X% for protection during this risk window.”
- Annual budget: “I’m willing to spend X% per year on insurance during uncertain periods.”
Budget first. Execute second.
Step 5: Choose one primary hedge tool
When beginners stack multiple hedges, they usually create a position they can’t explain—and they close it at the worst time.
Start simple: one tool, one goal, one exit rule.
The decision tree in plain English (If-Then rules)
- If short-term fear + want direct crash coverage → futures hedge
- If want a floor + keep upside → protective put
- If want cheaper protection + accept upside cap → collar
- If expect volatility explosion and can manage complexity → volatility strategies (advanced)
A quick mini-scenario (so this feels real)
Imagine you own a broad index ETF and you’re worried about the next three weeks.
- If you do nothing, you’re fully exposed: if the market drops 10%, you roughly feel the full 10%.
- If you add a partial hedge, you’re saying: “I’m okay with some pain, I just don’t want the full punch.”
That mindset—partial protection, limited drama—is where most beginners succeed.
Next, we’ll dive into the futures hedge because it’s the cleanest “turn down market exposure” tool.
Future Hedge: when you want simple, strong crash insurance
A futures hedge is the most direct way to reduce market risk without paying option premium.
Conceptually, you create a counterweight:
- Your portfolio is long the market (it loses when the market falls).
- Your hedge is short an index future (it gains when the market falls).
What a futures hedge is (plain English)
You keep your long portfolio and sell an index futures contract so part of your market exposure is offset.
If your portfolio behaves like the index, the hedge works cleanly. If your portfolio is concentrated or “high beta,” you may need a different size—and more caution.
Why people like it in crisis windows:
- No option premium draining every day.
- Instant protection when markets move quickly.
- Easy to switch on/off around known risk events.
This is why futures hedges often show up in short-term, tactical risk management.
Here’s the part that surprises beginners: futures are settled daily.
A quick scenario:
- Market rises this week.
- Your long portfolio is up.
- Your short futures position is down, and your broker may ask for more cash (variation margin).
Your net wealth can still be fine, but your cash flow might not be. That’s why liquidity discipline matters.
Beginner rule:
If you don’t have spare liquidity, do not use a large futures hedge. Start small or choose a different tool.
A tiny numbers example (how a partial hedge dampens a drop)
Let’s keep it simple and ignore tracking differences:
- Your portfolio is worth $10,000.
- You hedge 50% of your market exposure for a short window.
- If the market falls 10%, your long portfolio is down about $1,000.
- Your hedge may offset roughly half of that, so your net loss could feel closer to $500 (before costs and slippage).
That’s the core idea: you’re not trying to be “right.” You’re trying to reduce the chance you make a big emotional mistake.
Sizing (the beginner way): hedge a fraction, not “perfectly”
You don’t need perfect math. You need a hedge size you can tolerate.
Common starter sizes:
- 25% hedge: reduce pain, keep most upside
- 50% hedge: meaningful crash buffer
- 75%–100% hedge: strong protection for a short window
If this is your first hedge, 25–50% is usually a safer learning zone.
The trade-off: you’re giving up some upside on purpose
A strong futures hedge dampens gains in rallies. That’s not a failure—it’s the deal you made.
Write one sentence before you open the hedge:
“I’m willing to give up some upside for X weeks to reduce crash risk.”
If you can’t say that with a straight face, use a smaller hedge.
A clean execution checklist (keep it boring)
- Define the risk window: “I want protection for 3 weeks” or “until event X is over.”
- Choose hedge fraction: 25%, 50%, etc.
- Set the exit rule: time-based is simplest (close after the window).
- Hold extra liquidity: so margin doesn’t force a bad decision.
- Document your reason: one sentence on why futures (not options).
Two common mistakes to avoid
- Mistake: over-hedging for too long. Full hedges are powerful but can create regret in rising markets.
Fix: keep large hedges short-term; use partial hedges for longer uncertainty. - Mistake: treating the hedge like a day trade. Watching the hedge P&L every hour increases stress.
Fix: judge success at the portfolio level: “Did it reduce panic and limit losses?”
Where futures live (so the idea feels real)
Index futures are standardized contracts listed on major exchanges like Eurex and CME Group. Your broker’s margin rules and access will determine what’s practical.
Up next, we’ll shift from “offset exposure” to “buying a floor” with protective puts—and then we’ll look at collars for people who want protection without paying full insurance every time.
Protective Put at ~95% moneyness: paying for a floor (without capping upside)
If the futures hedge is “turn the market exposure down,” a protective put is “put a floor under the portfolio.”
You keep your stocks (or your index ETF). Then you buy a put option that increases in value if the market drops. That put can offset part of the losses on your long holdings.
What “~95% moneyness” means (in normal language)
“Moneyness” sounds technical, but here it’s simple:
- If the market is at 100, a 95% put has a strike around 95.
- That means you’re basically saying:
“I can tolerate the first ~5% drop, but I want help beyond that.”
Why this is beginner-friendly: you’re not trying to predict the exact bottom. You’re designing a safety net.
What you get: a cleaner emotional experience in bad weeks
A protective put is often the easiest hedge to hold mentally because the rules are intuitive:
- If markets rise: your portfolio participates.
- If markets drift: you paid insurance and got “nothing” (just like car insurance).
- If markets crash: the put turns from “cost” into “protection.”
That last point matters. The option isn’t there to make you feel smart. It’s there to make sure fear doesn’t push you into a decision you regret.
A real downside of protective puts is cost. In one broad crisis-focused test across multiple historical crash periods, a protective put near 95% moneyness averaged around ~1.8% of portfolio value in cost, while reducing average crisis losses materially (think: taking a typical “double-digit drawdown” and cutting it toward a mid-single-digit loss).
You don’t need to memorize those numbers. You need to remember the relationship:
- More protection (higher strike, longer time) → more premium.
- Less protection (lower strike, shorter time) → less premium.
The two decisions that make or break a protective put
1) Pick the protection window first (then pick the expiration)
Beginners often do this backwards: they buy a put because it’s cheap, then realize it expires before the scary part happens.
Start with the window:
- Event window (days–weeks): short-dated puts can make sense, but timing becomes important.
- Rough season (months): give yourself more time so you’re not forced to “re-buy insurance” every week.
A simple beginner approach: choose an expiration that comfortably covers your risk window, then commit to reviewing it on a schedule (not daily).
2) Decide how much of your portfolio you’re insuring
You don’t have to hedge 100% to get real benefits.
Common beginner coverage choices:
- 25% coverage: “I just want less panic.”
- 50% coverage: “I want a meaningful floor.”
- 75–100% coverage: “I’m guarding against a known storm.”
If you’re new, 25–50% coverage is usually enough to learn without paying huge premiums.
A quick “is this worth it?” test (no math-heavy spreadsheets)
Before you buy, answer:
- What loss am I trying to avoid?
Example: “I don’t want to live through a 25% drawdown again.” - What am I willing to pay for that?
Example: “I can pay 1%–2% over the next few months for protection.” - What would make me regret this hedge?
Example: “If markets rally hard, I might feel annoyed—but I can accept it.”
If you can’t accept “annoyed but safe,” protective puts will feel like failure in calm markets.
A beginner execution checklist (keep it boring)
- Write the goal in one sentence: “I’m buying a floor so I don’t panic-sell.”
- Choose a strike conceptually: around 95% is a common “first hedge” zone because it avoids paying for every wiggle.
- Choose an expiration that covers your risk window.
- Choose a coverage fraction (25–50% if new).
- Set one exit rule:
- Time-based: “Close it after the event window,” or
- Condition-based: “Close if volatility collapses and protection no longer makes sense.”
Mistakes beginners make (and how to avoid them)
- Mistake: buying ultra-short puts as your first hedge.
They can be cheap, but timing is unforgiving.
Fix: start with a longer window and smaller coverage. - Mistake: treating the put like a profit position.
Then you start “taking profits” early and lose the protection when it’s needed most.
Fix: measure success at the portfolio level, not the option P&L. - Mistake: forgetting liquidity needs during a crash.
A put can rise, but if you also need cash for living expenses or margin elsewhere, stress returns.
Fix: hedge after your emergency fund is solid.
A short transition thought
Protective puts are the cleanest “pay for a floor” hedge—but the cost can sting if you buy them repeatedly. That naturally leads to the next idea: what if you could lower the premium by giving up a little upside?
A collar is the practical compromise hedge.
You still buy a put for downside protection, but you also sell a call to help pay for it. That’s why collars often show up when people want protection without writing a big insurance check every time.
The basic shape:
- Long portfolio (stocks / ETF)
- Buy put (downside floor)
- Sell call (collect premium; caps upside)
Why collars feel “more adult” than they look
A collar forces you to be honest about a core question:
“Do I really need unlimited upside during this exact window?”
If you’re hedging a stressful 3–6 month period, you might happily cap upside in exchange for cheaper protection. You’re not trying to win every month—you’re trying to survive the ugly ones.
The one trade-off you must accept upfront
A collar is not sneaky. It’s explicit:
- If markets rally strongly, your upside is limited above the call strike.
- That can feel frustrating if you didn’t emotionally sign the contract with yourself.
So here’s the beginner mindset that makes collars work:
A collar is not for being right. It’s for sleeping.
A “human” way to pick strikes (without pretending precision)
You’ll see people obsess over exact strikes. Don’t.
Use a simple structure:
- Put strike: the level where you want meaningful protection (often a few percent below the market).
- Call strike: a level above the market where you’re genuinely okay selling some upside (often a few percent above).
Then check the net cost:
- If the call premium pays for most of the put, great.
- If not, decide whether the remaining cost is still acceptable.
The collar sweet spot: multi-month uncertainty
Collars tend to make sense when:
- You want to hedge for months, not days.
- You don’t want to keep paying full put premiums repeatedly.
- You can accept “I might not capture a big surprise rally.”
That’s why collars are often discussed as a “strategic hedge” rather than a quick tactical move.
A practical collar workflow (what you actually do month to month)
- Choose your hedge window (example: 3 months).
- Choose your protection level (where the put kicks in).
- Choose your upside cap (where you’d be okay giving up gains).
- Check the net premium (debit or credit).
- Decide your roll schedule (common: quarterly review).
- Write a one-line rule for early exit
Example: “If fear fades and volatility drops, I close the collar instead of letting it linger.”
“COMBO” and other call/put combinations: don’t overcomplicate it
You’ll see many named combinations that mix calls and puts in clever ways. As a beginner, you only need one filter:
Can I explain exactly what I’m giving up and exactly what I’m getting?
If the payoff is so complex you need a diagram every time, it’s usually too complex for a first real hedge.
A good beginner progression looks like this:
- Start with protective put (clean but costs premium)
- Then collars (reduce cost with a clear trade-off)
- Then only consider more exotic combos if you’ve executed the basics calmly for several cycles
Common collar mistakes (and the “fix”)
- Mistake: choosing a call strike too close “because it pays more.”
That often leads to regret in a normal market bounce.
Fix: place the call where you truly don’t mind capping gains. - Mistake: forgetting that collars need maintenance.
If you treat it like “set and forget,” you’ll wake up to an awkward position near expiration.
Fix: calendar a review date the moment you open it. - Mistake: using collars when you actually need upside.
If you’re rebuilding savings or making big contributions, capping upside may feel painful.
Fix: use partial coverage (hedge only a portion) so you keep meaningful upside.
Where to learn the mechanics safely
If you want a clean, beginner-oriented explanation of collars (payoffs, max gain/loss), the Options Industry Council and Cboe Options Institute have education materials that read like training, not hype.
A short transition thought
So far, we’ve talked about hedges where direction matters (downside protection). But sometimes the real risk isn’t “down.” It’s “anything could explode.” That’s where volatility strategies enter the picture—powerful, but easy to misuse.
Volatility strategies: Straddle (STD), Strangle (STG), and GUTS when the market might explode
Volatility strategies are for a different fear:
“I don’t know the direction, but I think the move will be big.”
They can protect you during surprise shocks, but they punish you if the big move doesn’t show up quickly enough.
Before we start: volatility hedges are not beginner defaults
If protective puts and collars are “insurance,” volatility trades can be “insurance plus timing.”
They can work, but beginners often struggle with two things:
- Time decay: options lose value as expiration approaches.
- Volatility pricing: if you buy options when implied volatility is already expensive, you can lose even if price moves.
So treat these as optional tools—and if you use them, use small size.
Straddle (STD): the pure “big move either way” bet
A straddle typically means:
- Buy a call
- Buy a put
- Same expiration
- Often near the current price (at-the-money)
What you’re buying:
- A chance to profit (or hedge) if the market moves sharply up or down.
- Exposure to rising volatility (often happens during panic).
What you’re paying:
- Two premiums (call + put), so it can be expensive.
When it makes sense:
- You expect a major event to cause a big move, and you truly don’t know direction.
- You want a hedge that’s less about “downside floor” and more about “shock absorber.”
Beginner warning:
If the market stays calm, straddles can decay fast and feel like a money leak.
Strangle (STG): cheaper than a straddle, but needs a bigger move
A strangle is similar to a straddle, but you buy options farther away from the current price:
- Buy an out-of-the-money put
- Buy an out-of-the-money call
- Same expiration
Because those options are farther from the money, they cost less. The trade-off:
- You need a bigger move for the hedge to kick in meaningfully.
When it makes sense:
- You expect violent movement, but you want lower upfront cost than a straddle.
- You can accept that “small moves won’t help.”
GUTS: stronger sensitivity, higher cost
A GUTS strategy uses in-the-money options (both call and put are in-the-money). The general idea:
- More expensive upfront
- Reacts more strongly to price moves
- Can feel “heavier” and more responsive in a fast market
This is usually not where a beginner starts. But it helps to know the category exists: it’s the “pay more to be more responsive” version of a volatility hedge.
The two volatility realities that surprise most beginners
1) The move must happen soon (time is not your friend)
Volatility hedges are like ice cubes. They melt. If you buy them too early, you pay for days of decay.
A beginner-friendly solution:
- Keep the hedge window tight.
- Use smaller size.
- Define a “time stop” (example: close after the event passes).
2) You can be right about price direction and still lose
This is the brutal one. Options prices include “implied volatility.” After a big event, volatility often drops (“vol crush”), which can reduce option value.
That means:
- You might get the move you expected, but if options were overpriced, the hedge underperforms.
Beginner fix:
Avoid using volatility strategies as your first hedge. And if you do use them, avoid ultra-short-dated “lottery” expirations.
A simple decision guide (straddle vs strangle vs “don’t do it”)
- Choose straddle if:
- you want the most direct “big move either way” exposure
- you can tolerate higher premium cost
- Choose strangle if:
- you want cheaper exposure
- you accept needing a bigger move to matter
- Choose neither (and stick to puts/collars) if:
- your true goal is “avoid drawdowns,” not “trade a volatility event”
- you’re new and don’t want timing pressure
Practical use-cases that actually happen (not theory)
- Macro event week: you’re worried about a sharp spike in volatility, not just a slow grind down.
- Concentrated portfolio: one sector dominates your holdings and you fear a sudden shock.
- You’re emotionally maxed out: you don’t want to stare at charts every hour—so you choose a defined-risk tool with a defined time window.
A beginner-friendly “risk control” checklist for volatility strategies
If you use these, keep it simple:
- Define the event window (start date, end date).
- Use small size (you’re learning; treat it like tuition).
- Set a time stop (close after the event passes).
- Don’t mix multiple volatility structures at once.
- Write down what must happen for this to work
Example: “I need a large move OR a volatility spike.”
Where these strategies are commonly discussed (for deeper learning)
If you want structured explanations with payoff diagrams, CFA Institute has clear educational material on options strategies, and exchanges like Eurex offer derivatives learning workbooks.
At this point, you’ve seen three different ways to hedge: paying premium for a floor, trading upside for cheaper protection, and hedging uncertainty with volatility structures. Next, we’ll make this usable in real life by talking about what breaks hedges in practice—rollovers, sizing, and the small “execution details” that quietly decide whether a hedge helps or hurts.
Premium cost, rollovers, and contract sizing: the part that breaks most hedges
Most hedges don’t fail because the strategy was “wrong.” They fail because the practical details were ignored: premium bleed, rushed rollovers, or sizing so aggressive you abandon it the first time it feels uncomfortable.
This section gives you the execution habits that make hedging sustainable for normal people—busy, beginner-level, and allergic to unnecessary complexity.
The hedge triangle: pick your trade-off on purpose
Every hedge trades off three things:
- Protection strength (how much downside you reduce)
- Cost (premium, spreads, fees, or opportunity cost)
- Upside freedom (how much you still participate in rallies)
You can’t maximize all three.
- Protective put: strong protection + upside kept, but you pay premium.
- Collar: cheaper, but upside is capped.
- Futures hedge: no option premium, but you must manage margin and you may dampen upside depending on size.
Your goal isn’t “perfect.” Your goal is “I can stick with this during a scary week.”
Premium cost: run it like an insurance budget
If you hedge with options, treat premium like an insurance bill, not a profit target.
Pick a budget first—then design the hedge inside it.
Beginner-friendly budget styles:
- Window budget: “Up to 1% for protection over the next 6–10 weeks.”
- Annual budget: “Up to 2%–4% per year when risk feels elevated.”
- Behavior budget: “If this prevents one panic sell, it’s worth it.”
If you don’t set a budget, you’ll buy the most expensive insurance exactly when fear is highest.
A practical note: option premiums usually rise when implied volatility is high. In plain English, insurance gets more expensive when everyone is scared. That’s why “hedge early, hedge smaller” often beats “hedge late, hedge huge.”
A quick way to track hedge drag (without overthinking)
Keep a simple Hedge Log with three numbers:
- Portfolio value at entry
- Total hedge cost (premium + fees + estimated spread)
- Result over the hedge window (portfolio down/up)
Then ask: Did this hedge reduce the chance I’d do something dumb?
That’s the real KPI for beginners.
If you want one extra metric without turning this into a math project, track your worst day during the hedge window:
- “Without hedge, I would have been down ~X% on the worst day.”
- “With hedge, I was down ~Y% on the worst day.”
That’s how you connect hedging to a real human outcome: fewer panic moments.
Rollovers: decide your rhythm before you trade
Options expire. If you want protection beyond expiration, you must roll.
The mistake is rolling only when you’re stressed.
Rule 1: Choose a rollover rhythm upfront
- Multi-month puts: review monthly; consider rolling when you’re inside the last ~30–45 days.
- Collars: many people prefer a quarterly rhythm because it’s predictable.
- Event-based volatility hedges: usually not rolled—closed when the event window ends.
Put the review date on your calendar the day you open the hedge.
Here’s what “predictable” looks like in real life:
- You open protection on January 10 for a 3-month window.
- You set calendar reminders for February 10 and March 10.
- At each reminder, you decide: keep, roll, or close—based on the original risk window, not on daily headlines.
Rule 2: Roll when you’re calm
In stress, spreads can widen and prices gap. Rolling in peak panic often means paying the worst prices.
If you want crisis protection, you generally want it on before the crisis feels obvious.
Rule 3: Don’t “cheap out” with tiny expirations
Short-dated options look cheap because they have little time left.
If you need 6 weeks of protection, don’t keep buying 7-day options and hoping you’ll roll perfectly every time.
Contract sizing: think in coverage fractions first
Sizing is where beginners get hurt.
Common problems:
- Over-hedge: you regret rallies and close early.
- Under-hedge: you feel no relief and conclude “hedging doesn’t work.”
- Mismatch: the hedge doesn’t move like your portfolio.
Start with coverage fractions:
- 25% coverage: “seatbelt”
- 50% coverage: “real cushion”
- 75%–100% coverage: “short storm window only”
If you’re new, 25%–50% is usually enough to learn and stay calm.
A plain-language notional check
You’re trying to match hedge notional to a fraction of your equity exposure.
- Broad index ETF portfolio → easier (more index-like)
- Concentrated portfolio → trickier (higher sensitivity, bigger gaps)
A beginner-friendly way to sanity-check “index-likeness” is to look at your past 3–6 months:
- If your portfolio moves roughly like the index on big days, it’s more hedgeable with an index instrument.
- If your portfolio is dominated by one sector or a few stocks, hedge results will be messier (still useful—just less precise).
When the exact sizing isn’t possible, round intentionally:
- If your goal is peace of mind, rounding slightly up can be okay.
- If your goal is minimizing drag, rounding slightly down can be okay.
Mini-scenario: why mismatch happens
You hedge with an index instrument, but your portfolio is mostly high-growth tech.
- The index drops 5%.
- Your portfolio drops 8%.
- Your hedge “works,” but not enough to feel calm.
That’s not proof hedging is useless. It’s proof sizing and portfolio composition matter. In that situation, beginners often do better with a smaller hedge plus a simpler portfolio (more diversified) than trying to “engineer” a perfect hedge.
Futures-only rule: don’t let margin become the real risk
Futures hedges can be powerful—but only if you have liquidity.
If a margin call would force you to close the hedge at the worst time, your hedge is too big.
Keep a dedicated cash buffer and size conservatively. If you feel tense about margin mechanics, use options-based hedges until you’re comfortable.
Execution friction: spreads, liquidity, and the 0DTE temptation
Hedges look clean on paper. Real markets have friction.
Three beginner-safe rules:
- Prefer liquid instruments (major index/ETF options, major index futures).
- Avoid “weird strikes” with ugly spreads—especially in stress.
- Be careful with 0DTE options: they’re popular, but they’re timing-sensitive and decay fast. For beginners, they often turn hedging into gambling.
One more practical execution detail: don’t confuse “cheap” with “good.” A far-out-of-the-money put might look affordable, but if it only pays off in a truly extreme crash, it may not reduce your stress in the more common 10%–20% drop.
The one-page hedge setup worksheet
Fill this out before any hedge:
- Risk window (dates): ________
- Fear in one sentence: ________
- Hedge budget: ________ (%)
- Tool: futures / protective put / collar / volatility hedge
- Coverage fraction: 25% / 50% / 75% / 100%
- Cash buffer (futures only): ________
- Exit rule (one line): ________
- Review date: ________
If you can’t fill this in, pause. Most regret comes from skipping budget, sizing, or exit rules.
Red flags: strategies the research found ineffective (and why)
Once you’ve seen how hedges are supposed to work, you also need a “do not touch” filter.
Research that stress-tested many standardized derivatives strategies across crisis periods found that some popular-looking approaches were unreliable crisis hedges. The big lesson:
Premium collection and clever structure are not the same as crash protection.
Selling calls can feel comforting because you’re paid upfront.
But as a crash hedge, it’s usually weak because:
- Your maximum gain is the premium.
- Your downside can be much larger than that premium.
If you collect 1% in premium and the market drops 15%, you didn’t hedge—you softened the blow a tiny bit.
Covered calls can be fine for income goals; they’re just not a reliable tail-risk tool.
Red flag #2: Ratio calendar spreads and other complexity traps
Some spreads look hedged but add hidden risks when things get chaotic:
- volatility changes don’t behave “normally”
- pricing relationships can move fast
- the position can become sensitive to factors you didn’t plan for (time, skew, volatility term structure)
If you can’t explain your max loss and worst-case scenario in one minute, it’s not your crisis hedge.
Red flag #3: “It only works if the market behaves nicely”
Crises are gaps, jumps, and violent repricing.
If a strategy needs smooth, orderly movement to work, assume it may break when you need it most.
A fast pre-trade red-flag checklist
Skip the strategy if you answer “yes” to two or more:
- Do I expect it to make money most months?
- Is my max gain small compared to my potential portfolio loss?
- Can’t I explain the payoff in one minute?
- Does it require frequent adjustments to stay “safe”?
- Am I choosing it mainly because it looks clever or cheap?
Can this help you “make money”? The realistic monetization paths
If you mean “hedging guarantees profit,” no. Hedging is usually a cost or a trade-off.
If you mean “can this improve my financial outcome,” yes—often in boring, meaningful ways.
1) Protect compounding by avoiding deep drawdowns
Smaller drawdowns need smaller recoveries.
Even if you pay some premium, avoiding a catastrophic behavior-driven mistake can be worth far more than the hedge cost.
2) Create “behavioral alpha” (stop paying panic taxes)
Hedging’s hidden value is decision quality.
A hedge can help you:
- keep contributing during downturns
- rebalance instead of freezing
- avoid panic selling and buying back higher
Measure success like this: “Did I follow my plan during stress?”
3) Unlock opportunities during sell-offs
The best buys often happen when fear is highest.
A partial hedge can give you the psychological and financial room to rebalance into risk assets instead of hiding.
4) Online earning paths (no hype, process-based)
If you want to monetize this knowledge online, focus on education and tools—not “signals.”
Ideas that beginners actually pay for:
- A “hedging explained like a human” email course or mini-guide
- A hedge budget + coverage fraction worksheet (template pack)
- Process coaching (risk window, budget, exit rules) without trade calls
- A monthly crash-prep routine product (checklists + reminders)
If you mention markets or instruments, keep it educational and link only to trusted trademarks or institutions like Cboe, CME Group, or Eurex.
Keep it ethical: no return promises, no fake certainty, and be mindful of local rules on financial advice and marketing.
Your 30-minute monthly hedging routine
This routine is designed to keep you prepared without turning you into a full-time watcher.
Do it once a month, and again only if a truly time-bound risk event appears.
Minute 0–6: Portfolio snapshot (one screen)
Answer quickly:
- Portfolio value today: ________
- Equity-like exposure (%): ________
- Cash buffer (emergency + investable): ________
- If the market fell 20% this month, what would I do? ________
If your answer includes “panic,” you need a smaller drawdown plan.
Minute 6–13: Risk calendar (define the window)
Look forward 4–8 weeks and list:
- major policy / central bank dates
- elections or known catalysts
- earnings season if you hold concentrated positions
- personal cash needs (tuition, rent, travel)
Choose your stance:
- Green: no hedge
- Yellow: partial hedge (25%–50%)
- Red: strong short-term hedge (50%–100%) for a defined window
Minute 13–24: Pick one hedge and size it simply
Match tool to stance:
- Yellow: protective put on a portion, or small futures hedge if you understand margin
- Red: futures hedge (if you have liquidity), protective puts (clean floor), or collar (cheaper with upside cap)
Then write one exit rule:
- “Close on [date].” (best for beginners)
or - “Close after the event ends.”
Time-based exits remove emotion.
If you want a quick “starter decision,” use this:
- If you hate margin mechanics → protective put or collar.
- If you have liquidity and want fast protection → small futures hedge.
Minute 24–28: Four execution checks
- Liquidity: am I using a widely traded contract?
- Cost: is premium inside my budget?
- Stress: will I feel forced to watch this daily?
- Cash buffer (futures): can margin moves force me out?
If any answer is “no,” reduce size or pick a simpler tool.
Minute 28–30: Log it (five lines)
- Date opened:
- Goal (one sentence):
- Tool + coverage fraction:
- Expected cost (budget):
- Exit rule + review date:
That’s how you turn hedging from a scary trade into a calm routine.
A sample “Yellow month” entry (so you can copy it)
- Date opened: Feb 6
- Goal: Reduce panic risk during a policy-heavy month
- Tool + size: Protective put, 50% coverage
- Budget: 1% maximum cost for the window
- Exit + review: Review in 30 days; close after the last event date
The one rule that prevents most bad hedges
Only hedge when you can name a time-bound risk window.
If it’s just vague anxiety, wait for your monthly review. Most expensive hedges are bought at peak fear.
If you want this to work in real life, don’t hunt for perfect strategies. Build the habit: budget, size, exit rule, review date.
Next time markets get noisy, you won’t need a new idea—you’ll already have a plan.
Disclaimer:
This article is for educational and informational purposes only and does not constitute financial, investment, legal, or tax advice. The examples, strategies, and terminology discussed (including options and futures) are general in nature and may not be suitable for your personal situation.
Investing involves risk, including the possible loss of principal. Derivatives such as options and futures carry additional risks (including leverage, margin requirements, liquidity constraints, pricing/volatility risk, and the possibility of losses exceeding the initial amount paid in some cases). Past performance and historical market scenarios do not guarantee future results.
Before taking any action, consider your goals, risk tolerance, time horizon, and financial circumstances. If you are unsure, consult a qualified financial professional and review the relevant product disclosures, fees, and your brokerage’s trading rules. You are solely responsible for any decisions you make and any outcomes that result from them.
If this guide helped you feel more confident about portfolio hedging strategies, you can support my work by buying me a coffee ☕😊
Your support keeps these practical, beginner-friendly posts coming (and helps me spend less time fighting charts and more time writing clearly 📈✍️).
👉 Buy me a coffee here: https://timnao.link/coffee 🙌


