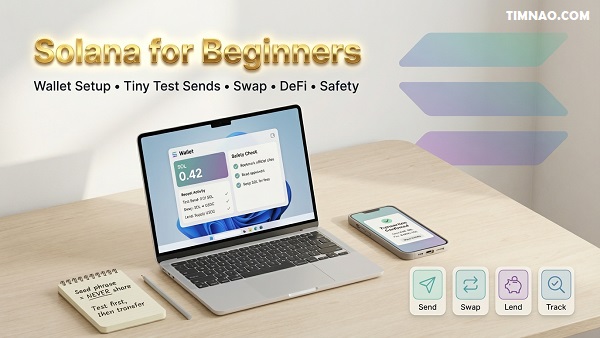
Solana for Beginners: The Amazing, Essential Guide to Using SOL Safely 🚀
Solana for beginners can feel surprisingly smooth—fast transactions, low fees, and apps that don’t make you wait around like you’re stuck in 2013. But that “instant” feeling can also trick new users into moving too quickly and making avoidable mistakes.
In this guide, you’ll learn the practical way to use Solana: set up a wallet safely, buy and test-send SOL, try swaps and DeFi with training wheels, and avoid the rookie traps (scams, bad approvals, risky bridges). It’s written like a real blog—short paragraphs, clear steps, and a calm plan you can actually follow.
Why Solana Feels “Instant”: Proof of History in Plain English
If you’re brand new to crypto, Solana can feel almost suspiciously fast. You click “Send,” blink once, and the transaction is done. That “instant” vibe is a big reason many people start searching for Solana for beginners guides in the first place—because it feels more like using a normal app than wrestling with finance tech.
But speed isn’t magic. It’s a set of design choices that help the network agree on what happened, in what order, without making everyone wait forever.
Here’s the beginner problem blockchains must solve:
- Thousands of computers need to agree on the order of transactions
- They don’t fully trust each other
- They still need to produce one “official” history that everyone can verify
Now the simple explanation:
Proof of History (PoH) is like a built-in timestamp system that helps the network keep a reliable sense of “what came first.”
Think of a busy restaurant kitchen.
- Orders come in fast.
- If nobody labels the tickets, chefs argue about which order was first.
- But if every ticket gets stamped by a reliable kitchen clock, the line moves smoothly.
PoH is that “stamp” idea—done cryptographically—so the network can process things efficiently and confirm transactions quickly.
Why “fast + cheap” matters to beginners (not just traders)
Even if you never plan to trade actively, speed and low fees can make learning easier because you can practice without feeling punished.
Here’s what speed unlocks for a beginner:
- Practice transactions with tiny amounts (so mistakes don’t become expensive lessons)
- Trying apps (wallets, swaps, NFTs) without long waits that make you second-guess everything
- A smoother learning curve because you get feedback immediately: “Did it work? Yes.”
A lot of beginners don’t quit crypto because they “hate crypto.” They quit because the experience feels confusing and slow. Solana’s speed can reduce that friction—when you use it correctly.
The important reality check: fast doesn’t mean risk-free
This is where beginners get trapped: they assume “instant” means “safe.”
It doesn’t.
Here’s what speed doesn’t protect you from:
- Sending to the wrong address
- Clicking a fake website
- Approving a sketchy transaction in your wallet
- Buying hype-driven tokens without understanding the downside
So keep this mindset:
Solana’s speed helps you learn faster. Your habits keep you safe.
A quick beginner mental model you can keep forever
If you remember just one thing from this section, remember this:
- Solana is designed to feel like modern software
- But it still behaves like financial infrastructure
- That means every click has consequences
So yes, it can feel instant. But you still want to move like a careful adult with a new credit card: small tests, double-checking, and no panic decisions.
Your First Solana Wallet: Phantom vs Solflare and the Private Key Rule
A wallet is your control center. It’s where you hold SOL, receive tokens, connect to apps, and approve transactions.
Two beginner-friendly options are:
Both can work. Your job isn’t to pick the “perfect” wallet. Your job is to pick one, set it up safely, and learn how to use it without making the classic mistakes.
Phantom vs Solflare: how to choose in 30 seconds
If you just want a simple rule:
- Choose Phantom if you want a very smooth beginner experience and a clean interface.
- Choose Solflare if you want a strong Solana-native wallet option with a solid reputation.
Honestly, most beginners will be fine with either. The bigger risk isn’t which wallet you pick—it’s how you handle your security setup.
The private key rule (the one that saves people from disaster)
Let’s translate wallet security into normal human language.
- Your wallet address (public key) is like your bank account number: you can share it to receive money.
- Your private key / seed phrase is like the master key to your entire account: if someone has it, they own your funds.
Rule: Never share your seed phrase. Not with anyone. Not ever.
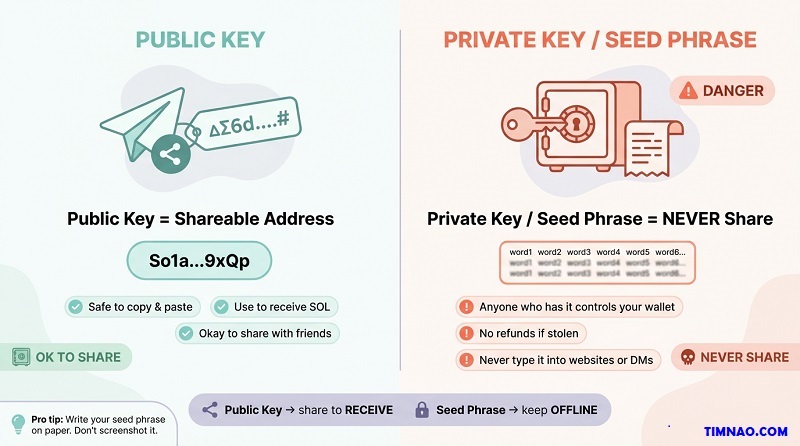
Not even with:
- “Customer support”
- “An admin in a Discord”
- “A helper in Telegram”
- “A website that says it needs verification”
If someone asks for your seed phrase, you’re not getting help—you’re being robbed.
Seed phrase storage: beginner-proof options (pick one)
Your seed phrase is not something you “remember later.” It’s your lifeline if your phone dies, your browser resets, or your computer gets replaced.
Choose one of these approaches:
Option A (simple and solid): paper + safe place
- Write it on paper (neatly)
- Store it somewhere private and secure
- Do not store it where guests, roommates, or coworkers can access
Option B (more durable): metal backup
- Use a metal seed storage product (common for serious holders)
- Helps protect from water/fire damage
What not to do (common beginner mistakes):
- Don’t screenshot it
- Don’t store it in Google Drive/Dropbox/Notes apps
- Don’t email it to yourself
- Don’t paste it into a “wallet recovery” website
If you do only one security thing right in crypto, do this one right.
What it means to “approve” or “sign” a transaction
When you use a wallet, you’ll see prompts like:
- “Approve”
- “Sign”
- “Confirm”
This is the moment you’re authorizing something on-chain.
Beginner mental model:
- Signing is like using your signature on a contract.
- The wallet is asking: “Do you approve this action with your identity (your private key)?”
- When you confirm, the network treats it as you saying “Yes, I authorize this.”
That’s why you should slow down on approvals. You’re not clicking “OK.” You’re approving real actions.
Your 5-minute wallet setup checklist (do this before adding money)
Before you deposit anything meaningful, do these quick steps:
- Install Phantom or Solflare from the official site
- Create a new wallet
- Write down the seed phrase offline
- Turn on a passcode/biometric lock in the wallet settings
- Practice finding your wallet address (so you can receive SOL)
- Close everything, reopen the wallet, and make sure you can access it smoothly
Optional, but smart:
- Create a second wallet later for “testing apps,” while keeping your main wallet cleaner
This separation (main wallet vs test wallet) reduces the risk of accidentally connecting your “real money” wallet to questionable sites.
Solana for Beginners: Buying SOL and Making a Tiny Test Send
This is where beginners either build confidence fast—or make an expensive mistake.
Your goal isn’t to buy a huge bag of SOL.
Your goal is to learn the process safely:
- Buy a small amount
- Move it to your wallet
- Do a tiny test send
- Only then do anything bigger
Step 1: Buy SOL using a reputable on-ramp (keep it boring)
Most beginners start by buying SOL on a centralized exchange, then withdrawing it to a self-custody wallet.
Two well-known exchanges many beginners recognize are:
Depending on your country, availability varies. The main idea is simple:
- Use a reputable platform
- Complete verification
- Buy a small amount of SOL
Beginner tip: Keep it boring on purpose. Your first priority is not “lowest fees in history.” Your first priority is “I understand what I’m doing.”
Step 2: Withdraw SOL to your wallet (the “copy/paste carefully” moment)
Once you have SOL on the exchange:
- Open your wallet (Phantom or Solflare)
- Copy your wallet address (public key)
- Go to the exchange → Withdraw → SOL
- Paste the wallet address
- Double-check the first 4 characters and last 4 characters match
- Send a small test amount first
This double-check habit is a lifesaver. Crypto transactions are typically irreversible. If you send to the wrong address, there’s usually no “undo.”
Step 3: Do the tiny test send (your confidence builder)
Once the test withdrawal arrives in your wallet, do a tiny practice send.
Here are two safe ways to do it:
Option A: Send to a second wallet you control
- Create a second wallet (or a second account inside your wallet app)
- Send a tiny amount between them
- Confirm it arrives
Option B: Send to a trusted friend
- Only if you’re 100% sure you have the correct address
- Start small, like a “coffee money” amount
What you’ll learn from this:
- How confirmations look in the wallet
- How fees work (usually small)
- How long it takes
- How to feel calm doing it
The #1 beginner mistake when buying and sending SOL (and the easy fix)
Mistake: Sending too much on the first try.
This usually happens because:
- People feel excited
- They assume they “got it”
- They skip the boring test step
Fix: Make “test transaction first” your personal rule.
A great beginner pattern is:
- First send: 5–10% of what you plan
- Second send: the remainder after the first arrives successfully
Keep a little SOL for fees so you don’t get stuck
On Solana, many actions require small fees. Even if fees are low, you still need some SOL to do things like:
- Swapping tokens
- Approving transactions
- Interacting with apps
Beginner rule:
- Always keep a small buffer of SOL in your wallet
- Don’t convert everything into other tokens
If you ever wonder “Why can’t I send this token?” one common reason is: you don’t have enough SOL for the network fee.
A simple “beginner budget” approach that prevents regret
Here’s a realistic mindset that keeps you sane:
- Pick a “learning budget” you can afford to lose
- Treat the first week like training, not investing
- Focus on skills: wallet setup, sending, receiving, understanding confirmations
Example budgets beginners often choose:
- $25–$100 if you want to learn with minimal risk
- $100–$300 if you plan to explore swapping and a small DeFi test later
No number is perfect. The point is: don’t let your learning experience turn into emotional chaos.
Quick safety checklist before you move beyond “test mode”
Before you go from “I tried it once” to “I’m ready to explore,” make sure you can confidently do these:
- I can find and copy my wallet address
- I understand public key vs seed phrase
- I can receive SOL successfully
- I can send a tiny test amount successfully
- I know to double-check addresses
- I know never to share my seed phrase
If you can do those, you’re already ahead of most beginners.
And from here, the next logical steps (later) are:
- trying a small swap on a DEX
- learning how approvals work
- exploring one app at a time without rushing
For now, the win is simple: you can buy SOL, hold it in your wallet, and move it safely.
DeFi Made Practical: MarginFi & Drift for Lending and Borrowing
DeFi sounds like a big scary word, but the core idea is simple:
- Lending: you deposit tokens into a pool and earn interest.
- Borrowing: you lock collateral and borrow something else against it.
On Solana, two names you’ll often see in lending/borrowing conversations are MarginFi and Drift. You don’t need to “master” them today—you just need to understand what you’re doing before you click Deposit or Borrow.
The beginner mental model: a vending machine for money (with rules)
Traditional finance has humans and paperwork. DeFi has rules written into code.
Imagine a vending machine:
- You put money in
- You pick a snack
- The machine follows rules exactly—no feelings, no exceptions
DeFi is similar. If the rules say you get liquidated at a certain threshold, it will happen automatically. That’s why beginners must learn the rules first and “play small” while learning.
Lending: what you’re actually earning (and what you’re risking)
When you lend on a protocol, you’re basically saying:
“I’m okay with my tokens being used as liquidity, and I want a cut of the interest.”
Where does the interest come from?
- Borrowers pay to borrow (like interest on a loan)
- Sometimes there are extra incentives (reward tokens)
Beginner-friendly way to start lending:
- Start with a stablecoin like USDC (commonly issued by Circle) if it’s available in the protocol you’re using.
- Or lend a small amount of SOL if you want to keep everything in one asset.
What to check before you deposit (simple, not technical):
- Is the protocol well-known? (You’re looking for “boring and established,” not “new and loud.”)
- Are you okay if this money is locked for a bit? (Sometimes withdrawals are instant, sometimes not.)
- Do you understand how to withdraw? (If you can’t confidently find the withdraw button and process, don’t deposit yet.)
Borrowing: the three words you must understand (Collateral, LTV, Liquidation)
Borrowing is where beginners get hurt, not because it’s evil—because it’s easy to misunderstand.
Collateral
The asset you lock up to “prove” you can repay.
LTV (Loan-to-Value)
How much you can borrow compared to your collateral value.
Liquidation
If your collateral value drops too far (or your debt becomes too risky), the protocol sells your collateral automatically to protect the system.
Here’s a beginner example (numbers made simple on purpose):
- You deposit $100 worth of SOL as collateral
- The protocol allows up to 70% LTV
- That means you could borrow up to $70 (often in a stablecoin)
Now the danger:
- If SOL price drops, your $100 collateral might become $80
- Your borrowed $70 is now too risky compared to collateral
- If you cross the risk threshold, the protocol liquidates part of your SOL
Beginner rule that saves wallets:
- Never borrow near the limit.
- If a protocol says you can borrow 70%, borrow 20–30% while learning.
A “safe sandbox” way to try DeFi lending/borrowing (without panic)
If you want the most beginner-proof approach, follow this order:
- Connect your wallet
- Deposit a tiny amount first
- Think “learning budget,” not “investment”
- Example: $20–$50 worth, just to see how the dashboard behaves
- Do lending only for your first week
- Supply asset → watch how interest accrues
- Practice withdrawing a small portion to confirm you understand the flow
- If you borrow, borrow absurdly small
- Borrow an amount that won’t trigger stress if you repay immediately
- You’re testing mechanics, not chasing a strategy
- Exit the position and write down what happened
- What fees did you pay?
- What steps felt confusing?
- What would you do differently next time?
That last step sounds boring, but it turns you from “button clicker” into someone who actually learns.
DeFi risk checklist (keep it practical)
You don’t need to be paranoid—but you do need to be aware.
Risk 1: Smart contract risk
The code could have bugs. Even good protocols can fail.
Risk 2: Liquidation risk
If you borrow, price moves can liquidate you fast.
Risk 3: Stablecoin risk
Stablecoins are designed to stay stable, but they are not magic. Understand what you’re holding.
Risk 4: UI phishing / fake sites
A fake site can trick you into approving a harmful transaction.
Risk 5: Incentive traps
High yields can be temporary promotions. When incentives end, yields drop.
Beginner safety defaults:
- Start small
- Avoid leverage
- Don’t borrow until you understand liquidation
- Use bookmarks for official sites
- If something feels rushed or overly hyped, step away
If you’re thinking, “Okay, DeFi is powerful, but I want something simpler,” that’s where NFTs and collectibles often come in—still risky, but in a different way.
NFTs and Meme Coins on Solana: Magic Eden, SPL, Pump.fun, Bonding Curves
This is the “culture” side of Solana—fast-moving, creative, sometimes hilarious, sometimes chaotic.
Let’s split it into two lanes:
- NFTs: collectibles and communities
- Meme coins: speculation and viral momentum
NFTs: what you’re actually buying (and what you’re not)
An NFT is a token that represents ownership of a specific digital item (often art, collectibles, or membership-style perks).
Beginner translation:
- You’re usually buying a collectible + a social signal + optional utility
- You are not buying guaranteed profit
Where beginners go wrong:
- They see a chart or a “floor price” and assume it behaves like a stock
- NFTs are often illiquid—meaning you might not be able to sell quickly at the price you want
A beginner-friendly way to explore NFTs on Magic Eden
A common Solana NFT marketplace is Magic Eden. Here’s a safe approach that keeps you in control:
- Browse first with no wallet connected
- Just learn what collections look like
- Notice how some projects have strong branding and clear info, and others feel… copy-paste
- Check collection authenticity signals
- Verified markers (if present)
- Clear official presence (website/social links)
- Consistent art style and messaging
- If you buy, use a “spending wallet”
- Create a second wallet account for NFT experiments
- Keep your main funds in your main wallet
- Buy one small item first
- Think of it like buying a concert ticket to learn how the system works
- Don’t treat it like a retirement plan
SPL tokens: why Solana tokens feel “standardized”
On Solana, many tokens follow the SPL token standard (Solana Program Library tokens). You don’t need the technical details. Just remember:
- SPL is a common format for tokens
- It makes wallets and apps compatible in predictable ways
But here’s the key beginner truth:
Standard format doesn’t remove scam risk. It just makes tokens easier to create and trade.
So you still need to check what you’re buying.
Meme coins and Pump.fun: understand the game before you play
Tools like Pump.fun made it extremely easy to create and trade meme coins quickly. That’s exciting for experimentation—and dangerous for people who treat it like “easy money.”
Beginner translation of the meme coin reality:
- Many tokens are created daily
- Attention moves fast
- Liquidity can vanish
- The people who win often have speed, tools, and experience
You can still learn from it—just don’t pretend it’s a stable investment environment.
Bonding curves (the simplest explanation that actually helps)
A bonding curve is a pricing mechanism where the token price changes based on supply and demand through a formula.
Beginner analogy:
- Think of a concert where ticket prices go up as more tickets sell
- Early buyers get cheaper tickets
- Later buyers pay more as demand rises
- If demand drops, prices can fall quickly
Why this matters:
- It creates momentum when people pile in
- It can also create nasty dumps when people rush out
The “don’t become exit liquidity” meme coin checklist
If you want to participate purely for learning, keep it controlled:
- Use tiny amounts only (money you’d spend on entertainment)
- Timebox it (example: “I’ll observe for 30 minutes and stop.”)
- Decide your exit rules before you enter
- “If it doubles, I take some profit.”
- “If it drops 30%, I’m out.”
- Avoid emotional averaging down
- Never borrow money to buy a meme coin
- Don’t chase after a pump already happened
A lot of beginners lose not because they’re “bad at crypto,” but because they enter with no plan and let emotions do the driving.
If DeFi is “money tools” and NFTs/memes are “culture tools,” the next section is the one many people overlook: Solana projects that connect to the real world and bigger institutions.
Beyond Trading: Helium, Hivemapper, and BlackRock’s BUIDL
One of the most useful mindset shifts in crypto is this:
Not everything is about trading coins. Some projects are about building networks and infrastructure.
On Solana, there’s been strong interest in real-world utility and tokenization—ideas that attract not only retail users, but also larger organizations.
Helium: the “people-powered network” idea
Helium is often discussed as a decentralized network model—where individuals can contribute to network coverage and get rewarded.
Beginner takeaway:
- It’s not “free money”
- It’s an incentive system: contribute something valuable → earn rewards
What beginners can do without buying hardware or going deep:
- Learn how the ecosystem works
- Understand what “incentives” mean in real networks
- Notice the difference between “a token that exists” and “a token connected to a system”
Hivemapper: mapping built by participants
Hivemapper is often framed as a community-driven mapping model—participants contribute data, and the system rewards contributions.
Beginner-friendly way to think about it:
- Instead of one company collecting everything, a network of contributors builds a dataset
- Tokens can coordinate participation and rewards
Even if you never participate directly, this is a great example of “crypto as coordination,” not just speculation.
Tokenization and BlackRock’s BUIDL: what it means in plain language
When people mention BlackRock’s BUIDL, they’re usually talking about the bigger theme: tokenization.
BlackRock represents the institutional world. When big finance explores tokenized products, they’re not doing it for memes—they’re looking for efficiency and new infrastructure.
Tokenization, beginner version:
- A traditional asset (like a fund share) is represented as a token
- Ownership tracking becomes more programmable
- Transfers and settlement can become faster or more streamlined
Why institutions care (in human terms):
- Faster settlement: fewer waiting days
- More transparency: clearer ownership records
- Programmability: rules can be embedded in how assets move
What’s still real (and sometimes misunderstood):
- These products may still be permissioned or regulated
- Not everyone can access everything
- It’s not automatically “DeFi for all”—sometimes it’s traditional finance using blockchain rails
A beginner “curiosity checklist” for real-world and institutional projects
When you see a project claiming real-world utility or institutional backing, ask:
- What real thing is being built?
Network coverage? Maps? Financial products? Something else? - Who are the users?
Regular people, businesses, institutions—or all of the above? - Where does value come from?
Fees, subscriptions, data licensing, network usage? - What are the risks?
Regulation, adoption, technical issues, token volatility? - What do I personally want from this?
Learning? Using the product? Speculating? Supporting the mission?
This keeps you grounded. It prevents the classic beginner problem: buying something you don’t understand because it sounds important.
Two mini scenarios (realistic and beginner-friendly)
Scenario 1: The “I want utility, not hype” learner
- You start by reading about Helium and Hivemapper
- You don’t buy anything yet
- You track how the project explains value creation
- You compare that to a random meme coin page
Result:
- You get better at spotting substance vs noise
- You become harder to manipulate with hype
Scenario 2: The “I heard about tokenization” curious beginner
- You learn what tokenization means
- You understand why institutions like BlackRock would explore token-based products
- You avoid assuming “institutional = guaranteed safe investment”
- You keep your actions simple: education first, small experiments later (if any)
Result:
- You stop being surprised by headlines
- You build a stable mental model that keeps working even when trends change
At this point, you’ve seen three different faces of Solana:
- DeFi tools (powerful but rule-heavy)
- NFTs/memes (creative but emotionally dangerous)
- Real-world + institutional themes (big potential, still evolving)
Next steps should feel calmer now—because you’re not just clicking. You’re choosing.
The 6-Step Solana Workflow: Send → Swap (Raydium/Orca) → Lend → Track
This workflow is designed to do one thing: keep you calm while you learn.
It’s not about “max gains.” It’s about building muscle memory—so when you use Solana again next month, you don’t feel like you’re starting from zero.
Step 1: Set a “Learning Budget” You Won’t Regret
What to do: Pick an amount of money you’re genuinely okay using as tuition.
Why it matters: Beginners make their worst decisions when the amount feels “too big to mess up.” Stress creates sloppy clicks.
How to do it (realistic options):
- If you’re super new: start with $25–$100
- If you want to try a swap + one DeFi action: $100–$300
- If any loss would hurt your life: reduce it until you can sleep normally
Tiny rule that helps: split your learning budget into two piles:
- Pile A (70–80%): “do not touch unless I’m confident”
- Pile B (20–30%): “hands-on practice money”
This keeps you from accidentally going full YOLO because you felt brave for 10 minutes.
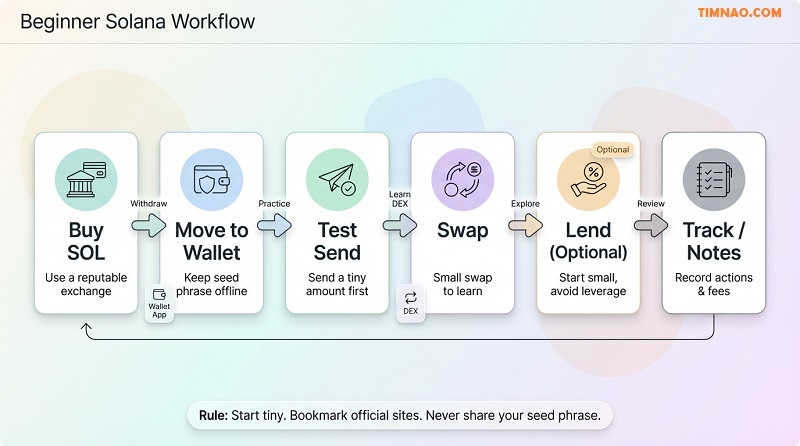
Step 2: Do a Clean “Test Send” Before Anything Else
What to do: Send a tiny amount of SOL from your exchange to your wallet, then (optionally) send a tiny amount to a second wallet you control.
Why it matters: If you can’t send and receive confidently, everything else becomes chaos later.
How to do it safely:
- Use a wallet like Phantom or Solflare
- Copy your wallet address
- Withdraw a small test amount from the exchange first
- When it arrives, send a tiny amount to:
- a second wallet account you create, or
- a trusted friend’s wallet (only if you’re confident)
Beginner habit: Always verify the first 4 and last 4 characters of the address after pasting. It sounds silly—until it saves you.
Step 3: Swap a Small Amount on a DEX (Raydium or Orca)
Swapping is where Solana starts feeling like a real app ecosystem.
What to do: Swap a small amount of SOL into another token (often USDC) using a decentralized exchange (DEX) like Raydium or Orca.
Why it matters: Swaps teach you the “connect wallet → review → approve” loop that shows up everywhere in crypto.
How to do it without getting burned:
- Start with a boring token pair (SOL → USDC is easier to reason about than SOL → random meme token)
- Use a small amount (like $5–$20 worth)
- Read the confirmation prompt carefully before approving
Simple swap checklist:
- ✅ You’re on the correct site (bookmark it after you verify)
- ✅ You understand what you’re swapping from and to
- ✅ You’re okay with the price moving a little during the swap
- ✅ You leave some SOL behind for fees (don’t swap 100% of your SOL)
Beginner note on “slippage”:
Slippage is how much the final price is allowed to move during the trade. If slippage is too high, you can get a worse deal than expected. As a beginner, keep it conservative and avoid trading illiquid tokens where slippage can be nasty.
Step 4: Try Lending First (Before You Even Think About Borrowing)
This is where people hear “yield” and their brains go fuzzy. Don’t rush.
What to do: Supply (lend) a small amount on a lending protocol like MarginFi or Drift.
Why it matters: Lending teaches DeFi basics with less complexity than borrowing.
How to do it in training mode:
- Deposit a small amount
- Watch how the dashboard shows your position
- Practice withdrawing a portion the next day
The goal isn’t the interest. The goal is understanding:
- where your deposited tokens appear
- how withdrawals work
- what it looks like when something is “active”
If you can supply and withdraw smoothly, you’re learning faster than most people.
Step 5: If You Borrow, Borrow “Embarrassingly Small” (and Leave a Safety Buffer)
Borrowing is where beginners get liquidated. Not because they’re dumb—because the rules are unforgiving.
What to do: If you want to test borrowing, do it with a tiny amount and a huge safety buffer.
Why it matters: Price moves can push your position into danger quickly.
How to do it like a cautious adult:
- Borrow at 20–30% of what the platform says you can borrow
- Avoid borrowing against volatile collateral if you don’t understand liquidation math
- Have a plan to repay (don’t “figure it out later”)
Beginner-friendly borrowing mindset:
Borrowing is not “extra money.” It’s a leveraged position with rules. If you don’t know what liquidation means in practice, borrowing is a “later” activity.
Step 6: Track What You Did (So You Actually Improve)
This sounds boring. It’s also the difference between “random clicking” and “skills.”
What to do: Keep a short log of each action you take.
Why it matters: Crypto punishes vague memory. You want receipts and clarity.
How to do it (keep it simple):
- Use a notes app with this template:
Mini tracking template
- Date:
- Action: (send / swap / lend / withdraw)
- Amount:
- What I expected:
- What happened:
- What confused me:
- What I’ll do next time:
If you do this for a week, you’ll feel 10x more confident—because you’ll stop repeating the same mistakes.
The Rookie Mistakes That Cost Real Money (Outages, Wormhole, Scams)
Most beginner losses don’t come from “bad luck.” They come from predictable errors that scammers and market conditions love.
Here are the ones worth tattooing on your brain.
Mistake 1: Treating Your Seed Phrase Like a Password Reset
If anyone asks for your seed phrase, it’s a scam. Always.
Why it matters: Your seed phrase is the master key. Whoever has it owns your wallet.
How to avoid it:
- Never type your seed phrase into any website
- Only use it inside the official wallet recovery flow (Phantom/Solflare)
- Don’t store it in screenshots or cloud notes
Fast reality check: No legitimate support team needs your seed phrase. Ever.
Mistake 2: Approving Transactions Without Reading (the “Yes-Yes-Yes” Trap)
Wallet prompts can feel like pop-ups you want to close. That’s dangerous.
Why it matters: Some approvals give permissions that can drain tokens later.
How to avoid it:
- Slow down when you see “Approve” or “Sign”
- If the prompt looks strange, cancel
- If a site pressures you (“Hurry!”), leave
Beginner rule: If you don’t understand what you’re approving, you’re not “missing out.” You’re dodging risk.
Mistake 3: Using Bridges Too Early (Wormhole Included)
Bridges let you move assets across chains. They can be useful. They also add complexity.
One well-known cross-chain tool is Wormhole.
Why it matters: Bridging introduces extra steps, more points of failure, and more opportunities for phishing.
How to avoid it (beginner approach):
- Don’t bridge unless you have a clear reason
- If you must, bridge tiny amounts first
- Double-check the official site and every step
- Keep a calm pace—bridging while stressed is how mistakes happen
Beginner shortcut: If you’re learning Solana, you can often avoid bridging by simply buying SOL on an exchange and withdrawing directly to your Solana wallet.
Mistake 4: Panic During Congestion or Outages
Networks can get congested. Sometimes apps lag. Sometimes transactions fail.
Why it matters: Panic makes you spam clicks, sign multiple transactions, or accept weird prompts just to “fix it.”
How to avoid it:
- If the network feels unstable, stop doing “important” actions
- Don’t repeatedly submit the same transaction without understanding what’s happening
- Wait, refresh, and verify balances before retrying
Calm rule: If things are glitchy, treat it like online banking downtime. You don’t keep smashing “send.”
Mistake 5: Chasing Meme Coins Like It’s a Job Interview
Meme coins move fast. That speed can hijack your brain.
Why it matters: Many beginners become exit liquidity because they buy after the hype peak.
How to avoid it:
- Only use “entertainment money”
- Decide your exit rules before you buy
- Avoid buying something just because it’s trending
Practical boundary: If a token’s main marketing is “we’re going to the moon,” treat it like a casino ad.
Mistake 6: Mixing “Main Wallet” and “Experiment Wallet”
A lot of pain happens because people connect their main wallet to everything.
Why it matters: One bad approval from a sketchy site can create a mess.
How to avoid it:
- Keep a “clean” wallet for holding
- Keep a separate “testing” wallet for new apps and experiments
- Move only small amounts into the testing wallet
This single habit can save you from the worst-case scenario.
Your 7-Day Plan to Explore Solana Safely (Plus Quick Questions)
This plan is meant to feel doable, not heroic. You’re building confidence, not trying to speedrun crypto.
Day 1: Set up your wallet and lock in safety
- Install Phantom or Solflare from the official site
- Write down seed phrase offline
- Turn on passcode/biometrics
- Create a second “testing wallet” account if your wallet supports it
Quick question: Should I start with one wallet or two?
If you’re brand new, one is okay. If you plan to explore DeFi/NFTs/memes, two wallets (main + testing) is smarter.
Day 2: Buy SOL and do a tiny test deposit
- Buy a small amount of SOL on your exchange
- Withdraw a tiny test amount to your wallet
- Verify it arrived
Quick question: How much is “tiny”?
Whatever won’t upset you if you mess up. For most beginners, that’s the price of a coffee or lunch.
Day 3: Practice a tiny send (and learn the calm pace)
- Send a tiny amount from your testing wallet to your main wallet (or vice versa)
- Get comfortable reading confirmations
- Note what fees look like
Quick question: Why do this if I’m not sending money to friends?
Because the “send” action is the foundation. Once you trust it, everything else gets easier.
Day 4: Do your first small swap on a DEX
- Connect your wallet to Raydium or Orca
- Swap a small amount (SOL → USDC is a beginner-friendly pair)
- Confirm balances afterward
Quick question: Do I need to chase the “best price”?
Not as a beginner. Your first goal is learning the process safely, not optimizing pennies.
Day 5: Try lending (optional, but great for learning)
- Visit MarginFi or Drift
- Supply a small amount (training mode)
- Learn how to withdraw (even if you don’t withdraw yet)
Quick question: Should I borrow on Day 5?
No. Borrowing is a “week 2 or 3” move after you understand dashboards, health factors, and liquidation.
Day 6: Explore NFTs or communities without buying
- Browse Magic Eden without connecting your wallet at first
- Learn what “collections” look like
- If you connect your wallet, do it with your testing wallet
- Only buy if you genuinely like the item and accept it might not resell easily
Quick question: Is an NFT purchase a good first investment?
Not usually. Think of it like buying a collectible, not a savings plan.
Day 7: Clean up and make your “personal rules”
- Review everything you did (your tracking notes)
- Remove apps you don’t trust
- Decide your personal rules for next week, such as:
- “I never approve transactions when rushed”
- “I only use bookmarked official sites”
- “I never swap 100% of my SOL”
- “I keep a testing wallet for experiments”
Quick question: What’s the main win after 7 days?
Not profit. The win is: you can send, swap, and interact safely without feeling lost.
If you only have 1 hour total this week
Do this minimum set:
- Wallet setup + seed phrase storage
- Buy SOL + tiny test deposit
- One tiny send (optional)
That’s enough to build a real foundation.
If you have 15 minutes a day
Follow the full 7-day plan above. Short, steady progress beats weekend panic learning.
If you already know crypto basics
- Run the 6-step workflow with small size
- Try lending (supply) and learn the interface
- Practice using a testing wallet for risky apps
- Keep bridging as a “later” skill unless you truly need it
FAQs: Beginner Questions About Solana for Beginners Answered
Do I need SOL in my wallet even if I mostly hold other tokens?
Yes. Keep a small amount of SOL for transaction fees and basic actions. Beginners often get stuck because they swapped everything and can’t pay fees.
Is it safer to keep SOL on an exchange?
It can be simpler for holding, but you won’t learn the Solana ecosystem that way. A practical approach is:
- Keep most funds on an exchange at first
- Move only your learning budget into your wallet
What’s the safest first DeFi action on Solana?
Supplying (lending) a small amount on a reputable protocol is generally simpler than borrowing. Borrowing adds liquidation risk, which is where beginners get hurt.
How do I avoid fake Solana sites?
- Only use bookmarked official sites after verifying them
- Never click random “airdrop” links
- Don’t trust DMs offering help
- If a site pressures you to act fast, leave
Should I use Raydium or Orca?
Both Raydium and Orca are commonly used. As a beginner, the more important thing is:
- use the official site
- swap small amounts
- understand what you’re approving
Why do people say “don’t bridge” when you’re new?
Because bridging adds complexity and risk. Tools like Wormhole can be useful, but beginners often make mistakes during multi-step processes—especially if they’re rushed.
What’s the smartest way to try meme coins without getting wrecked?
- Use entertainment money only
- Decide your exit rule before entering
- Avoid buying after a huge pump
- Don’t treat it like a long-term plan unless you truly understand the risks
What if the network is slow or an app glitches?
Don’t panic-click. Wait, verify balances, and retry later. Congestion/outages are exactly when scammers and mistakes multiply.
How do I know when I’m “ready” for bigger amounts?
If you can do these calmly, you’re progressing:
- send + receive without anxiety
- swap and verify balances
- understand approvals and refuse suspicious prompts
- track what you did
When you can do that repeatedly without confusion, you’ve earned the right to size up—slowly.
If this guide helped you feel more confident with Solana, you can support my work by buying me a coffee ☕💛
It keeps the tutorials coming, helps me update posts more often, and lets me create more beginner-friendly, step-by-step guides (without the fluff).
👉 Buy Me a Coffee here: https://timnao.link/coffee 🙌🚀


For the reason that the admin of this site is working, no uncertainty very quickly it will be renowned, due to its quality contents.